Please login with your username and your password. Select the module ‘Parallel key’ through the tree
structure of the project manager by double-clicking on the module or clicking on the button ‘New
calculation’.
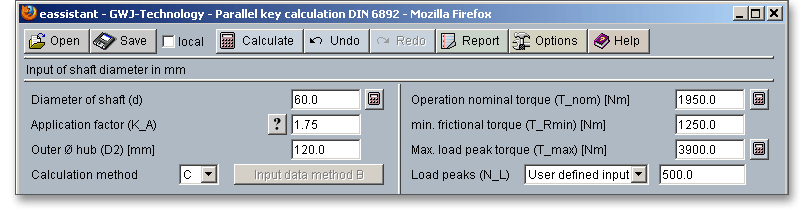
A strength calculation for the following shaft-hub-connection is required (see also DIN 6892, Example E.2). Enter the following values into the input fields:
| Shaft diameter | = 60 mm |
| Application factor | = 1.75 |
| Outer diameter hub | = 120 mm |
| Calculation method | = B |
Operation nominal torque  | = 1.950 Nm |
Min. frictional torque  | = 1.250 Nm |
Max. load peak torque  | = 3.900 Nm |
Load peaks  | = 500 |
| Material shaft | = C45 hardened and tempered |
| Material hub | = 34CrNiMo6 hardened and tempered |
| Parallel key | = DIN 6885.1 AB 18 x 11 x 100 |
| Material parallel key | = 34CrNiMo6 hardened and tempered |
| Standard length parallel key | = 100 mm |
| Number of parallel keys | = 1 |
| Inputs Method B: |
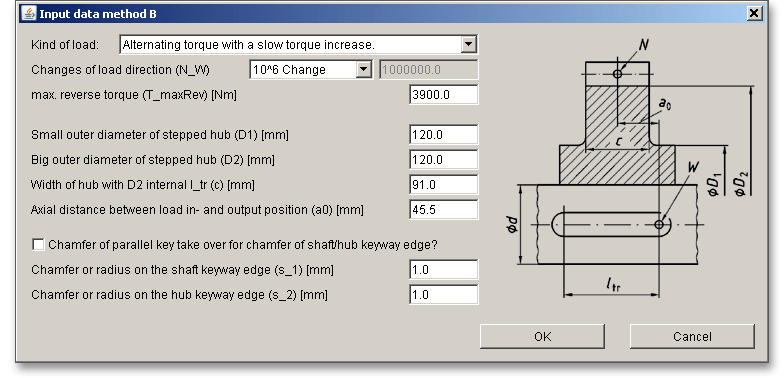
| Kind of load | = Alternating torque with a slow torque increase |
| Changes of load direction | =  |
Max. reverse torque  | = 3900 Nm |
Small outer diameter  | = 120 mm |
Large outer diameter  | = 120 mm |
Width of hub within  | = 91 mm |
Axial distance  | = 45.5 mm |
Chamfer/radius on shaft keyway edge  | = 1.0 mm |
Chamfer/radius on shaft keyway edge  | = 1.0 mm |
Please start to enter the values into the input field. All important calculation results will be calculated during
every input and will be displayed in the result panel. A recalculation occurs after every data input. During the
input of the values it can happen that the results will be marked in red. Nevertheless, please continue to input
the data as usual. For the load peaks  , please select the entry ‘User defined input’ from the listbox. Enter
the the value ‘500’ into the adjacent input field.
, please select the entry ‘User defined input’ from the listbox. Enter
the the value ‘500’ into the adjacent input field.
The direction of the torque is reversed and a rough calculation according to Method C is not possible. It is recommended to use the calculation method B. Select the calculation method B from the listbox and click the button ‘Input data method B‘.
Clicking this button opens the window ‘Input data method B’ and allows you to enter the other input values.
Note: If, at a later time, you need to change certain values, then click the button ‘Input data method B’ and the
input mask will open again.
Specify the material for the shaft and the hub. The material for the shaft is ‘C45 hardened and tempered’. The required material for the hub is ‘34CrNiMo6 hardened and tempered’. Both materials can be selected from the listbox.
Select the material either from the listbox or click the button ‘Material’ to open the material database. The
database allows you to choose the material. You also get detailed information on the kind of material, hardness
factor  , yield point as well as support factor
  .
.
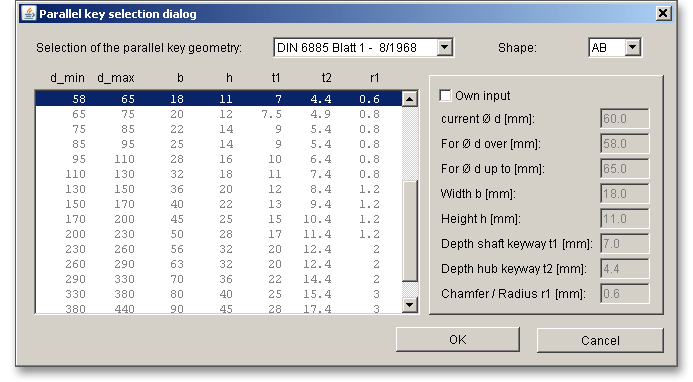
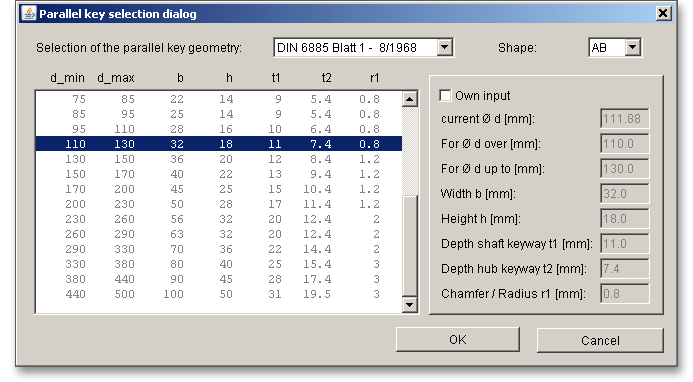
The parallel key selection according to DIN 6885 sheet 1 to 3 makes it easier to choose the required parallel key.
You can also select the geometry and size of the parallel key. The database also provides the standard lengths
of the parallel keys. The dimensions of the parallel key are as follows: DIN 6885.1 AB 18 x 11 x
100
In order to define the standard length of the parallel key, select the value ‘100’ from the listbox.
Click on the button ‘Parallel key’ to select the shape of the parallel key.
The geometry selection shows the suitable parallel key. Select the parallel key geometry ‘DIN 6885 sheet 1-8/1968’ as well the shape ‘AB’ from the listbox. Click the button ‘OK’ to confirm the values.
Select the material ‘34CrNiMo6 hardened and tempered’ from the listbox. If you need further information on the material, click the button ‘Material’ to open the material database.
The supporting length  is determined automatically from the selected standard length. You can use the
listbox to select the number of parallel keys. For our calculation example we specify one parallel
key.
is determined automatically from the selected standard length. You can use the
listbox to select the number of parallel keys. For our calculation example we specify one parallel
key.
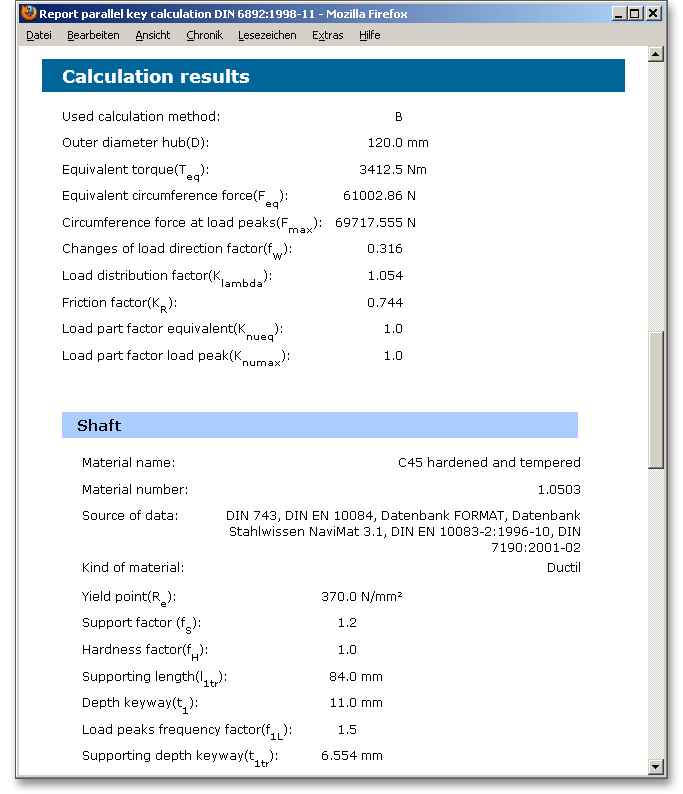
All important calculation results, such as the safeties for the operation load or at the maximum load for all three components (shaft, hub and parallel key) or the equivalent pressure will be calculated during every input and will be displayed in the result panel. A recalculation occurs after every data input. Any changes that are made to the user interface take effect immediately. You will get the results for the equivalent pressure and for the pressure at load peak as well as the safety at operation load and the safety at peak load.
In our calculation example the safeties for the shaft, the hub and the parallel key are marked red. That means the minimum safeties are not fulfilled. In addition, you get also an appropriate message in the message window. The parallel key is not suitable for our calculation example.
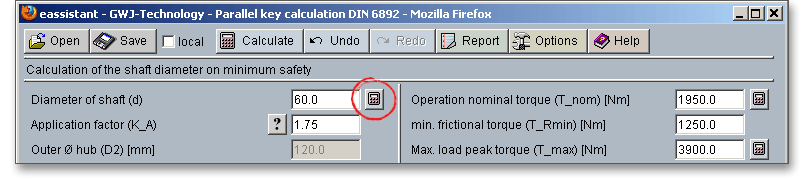
Use the automatic dimensioning function (calculator button) in order to determine the shaft diameter. With just one click, the program automatically determines the shaft diameter so that the required minimum safety of ‘1.2’ will be fulfilled. In order to do so, please click the calculator button next to the input field of the shaft diameter.
Now the new shaft diameter is determined.
The shaft diameter is now  = 111.88 mm. With this diameter the minimum safety of ‘1.2’ is achieved and the
parallel key is suitable for this application. The safety can even be increased by selecting another
material.
= 111.88 mm. With this diameter the minimum safety of ‘1.2’ is achieved and the
parallel key is suitable for this application. The safety can even be increased by selecting another
material.
Due to the new dimensioning, the shaft diameter is significantly larger now. A new size of the parallel key was determined automatically. Click the button ‘Parallel key’ and the larger parallel key is displayed automatically.
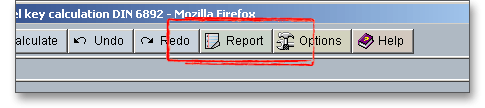
Use the button ‘Report’ to generate the calculation report very fast. This report contains the calculation method, all input values as well as the detailed results.
The calculation report contains a table of contents. You can navigate through the report via the table of contents that provides links to the input values, results and figures. The report is available in HTML and PDF format. Calculation reports, saved in HTML format, can be opened in a web browser or in Word for Windows.
You may also print or save the calculation report:
 ‘Save as’ from your browser menu
bar. Select the file type ‘Webpage complete’, then just click on the button ‘Save’.
‘Save as’ from your browser menu
bar. Select the file type ‘Webpage complete’, then just click on the button ‘Save’.
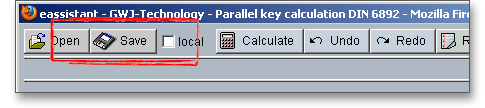
When the calculation is finished, you can save it to your computer or to the eAssistant server. Click on the button ‘Save’.
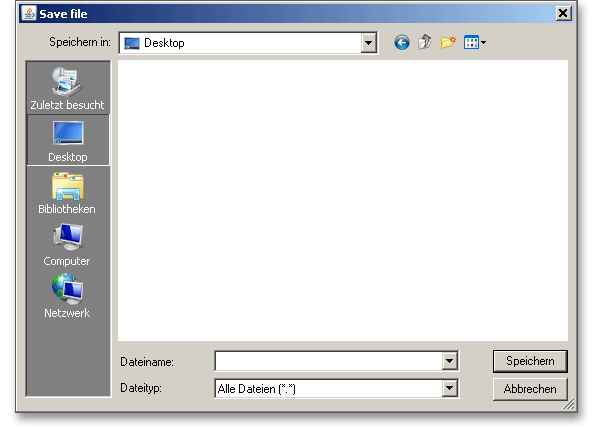
Before you can save the calculation to your computer, you need to activate the checkbox ‘Enable save data local’ in the project manager and the option ‘Local’ in the calculation module. A standard Windows dialog for saving files will appear. Now you will be able to save the calculation to your computer.
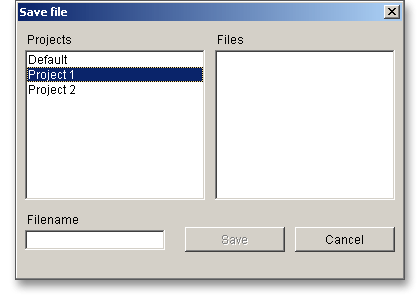
In case you do not activate the option in order to save your files locally, then a new window is opened and you can save the calculation to the eAssistant server. Please enter a name into the input field ‘Filename’ and click on the button ‘Save’. Then click on the button ‘Refresh’ in the project manager. Your saved calculation file is displayed in the window ‘Files’.
Our manual is improved continually. Of course we are always interested in your opinion, so we would like to know what you think. We appreciate your feedback and we are looking for ideas, suggestions or criticism. If you have anything to say or if you have any questions, please let us know by phone +49 (0) 531 129 399-0 or email eAssistant@gwj.de.