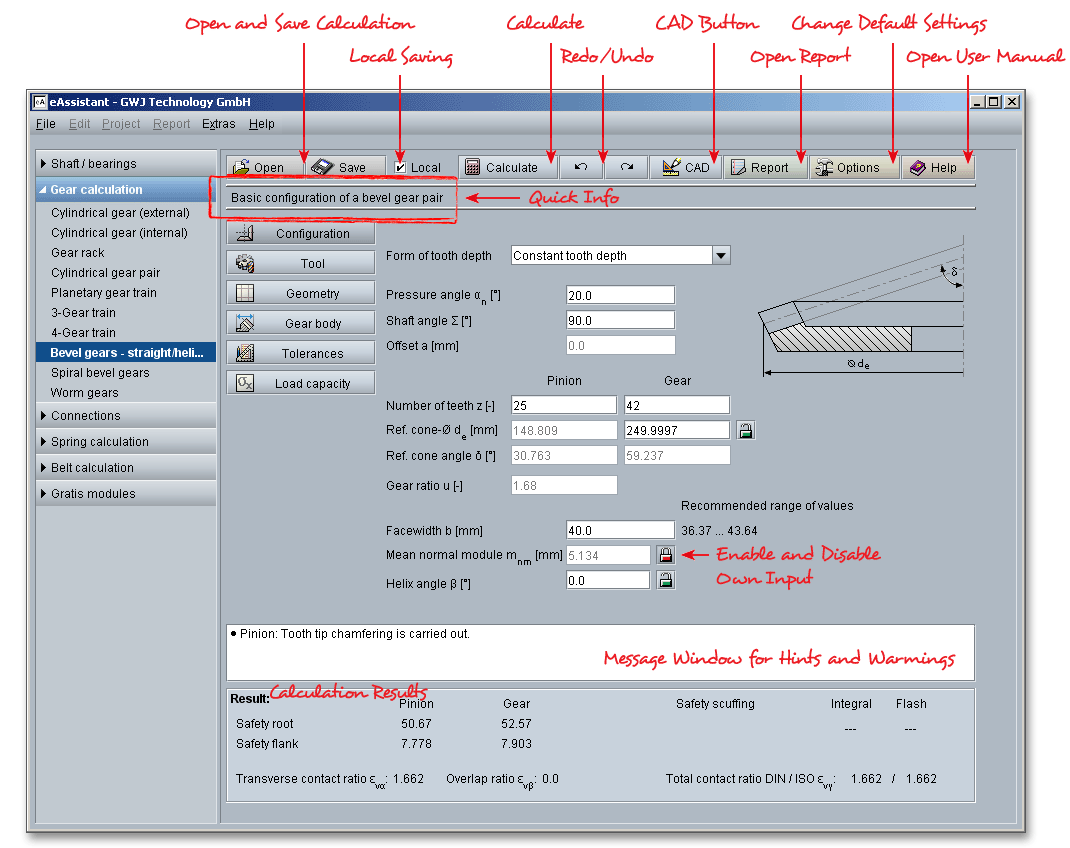
Please login with your username and your password. To start the calculation module for straight or helical bevel gears, please click the menu item ‘Gear calculation’ on the left side and then select ‘Bevel gears - straight/helical’.
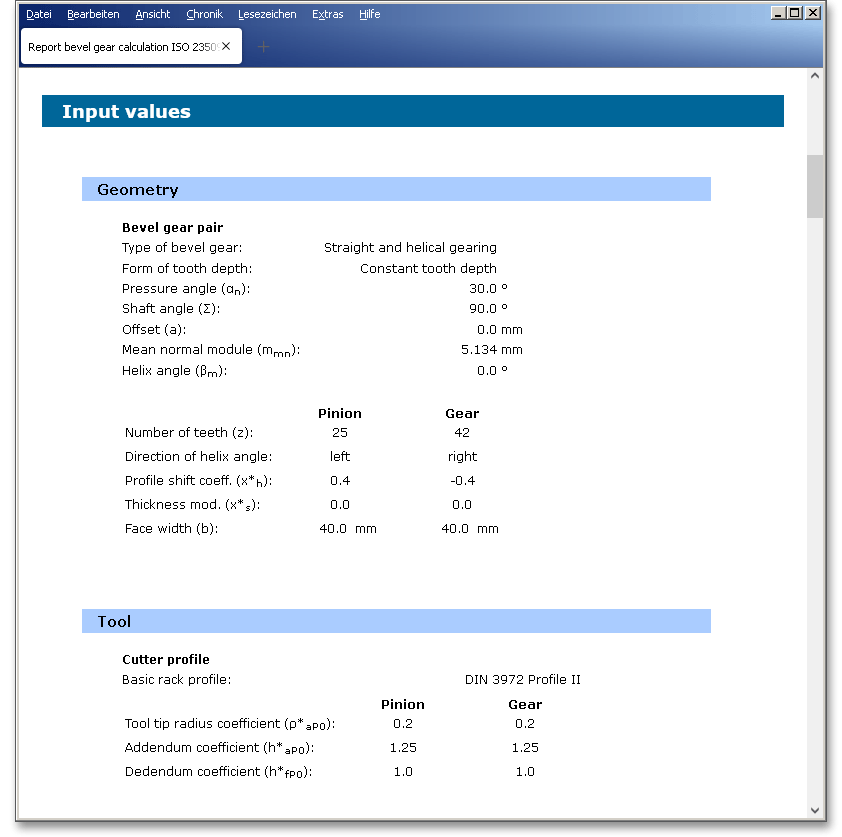
The general calculation of bevel gears is based on the ISO 23509 standard. The bevel gear tooth system is clearly determined by the reference cone angle \(\delta \) and a basic crown gear. The crown gear is a bevel gear where the reference cone angle is \(90^\circ \). This causes the reference cone of the bevel gear to merge into the crown gear reference plane perpendicular to the gear axis. The basic crown gear is an important factor for the basic rack profile. The relation of a crown gear and bevel gear is similar to that of a rack and a spur gear. The configuration part of the calculation module allows the input of the pressure angle, the number of teeth and a desired reference cone diameter on the back cone of the gear. A recommended range of values for the facewidth is displayed to the right of the corresponding input field.
Please Note: All results will be calculated during every input and will be displayed in the result panel. A
recalculation occurs after every data input. Any changes that are made to the user interface take effect
immediately. In case a minimum safety is not fulfilled, the result will be marked red. Press the Enter key or move
to the next input field to complete the input. Alternatively, use the Tab key to jump from field to field or click the
‘Calculate’ button after every input. Your entries will be also confirmed and the calculation results will displayed
automatically.
Depending upon the tooth depth along the facewidth (constant or tapering tooth depth) or the curvature of tooth
traces, the bevel gears are categorized into the following types - straight, helical and spiral bevel gears. The
tooth form of bevel gears is slightly modified from the spherical involute tooth form. Bevel gear
teeth are said to have an octoid form. The line of action is a figure eight curve between the mating
pair.
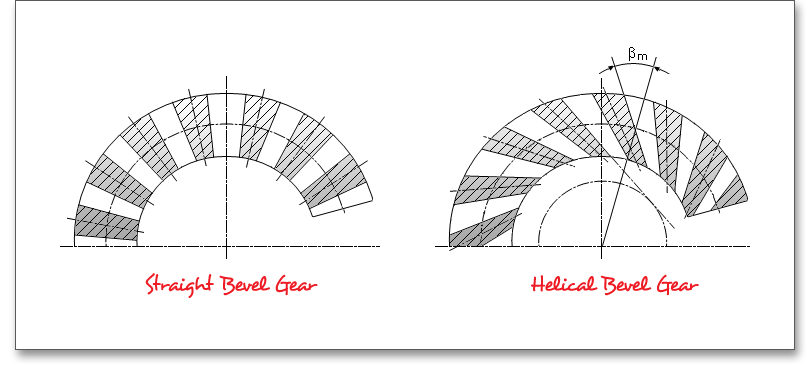
Straight bevel gears are the simplest form and most widely used type of bevel gears. The teeth are straight but
their sides are tapered. At the end the tooth is large, while at the other end it is small. If the tooth
flanks are extended inward they will intersect the axis in a common point called the reference cone
apex. The contact on the driven gear begins at the top of the tooth and progresses toward the root.
It should be noted that straight bevel gears tend to be noisy in operation. Errors in tooth profile,
pitch or assembly limit the capacity of bevel gears in high-speed applications. These gears are
recommended at less speed and when loads are light or where smoothness and quietness are not so
important.
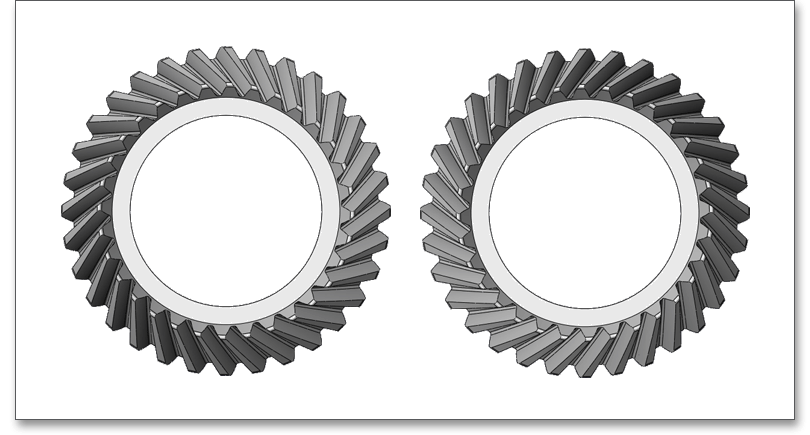
A helical bevel gear is a toothed gear in an angular design. The teeth are inclined by the helix angle. Helical bevel gears have significantly better characteristics than straight bevel gears. The contact between the teeth starts at one end of the gear and then spreads across the whole tooth. The teeth engage more gradually than straight bevel gears, the total contact ratio is increased and causes the gears to run quieter and perfectly smoother. They are mainly used in applications requiring high speeds, large power transmission or where noise prevention is an important factor.
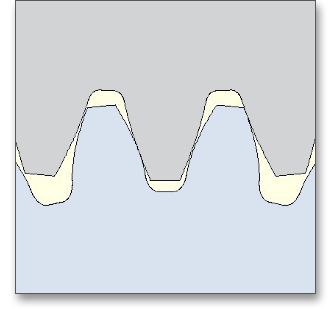
The tooth depth along the facewidth is another distinguishing feature of bevel gears. The eAssistant software allows to select either the tooth depth according to DIN 3971 - Figure 1, standard cone or the constant tooth depth or from a listbox. A figure next to the listbox illustrates the difference between the types.
The tooth depth according to DIN 3971 - Figure 1 is the configuration where reference cone apex, tip cone apex and root cone apex intersect in a common point.
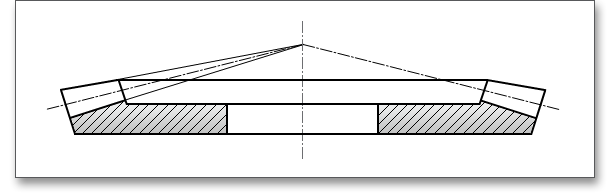
The depth changes in proportion to the cone distance. If the root line is extended, it intersects the axis of the pitch cone apex. Most straight bevel gears are often designed with a standard depth taper.
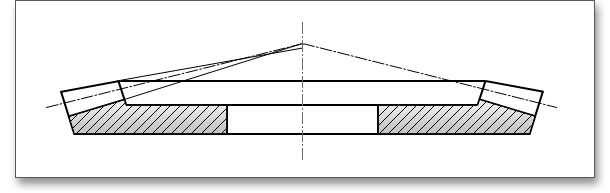
The tooth depth remains constant along the facewidth and the face and root angle are identical and both have the same value for the reference cone angle, disregarding the angle modification. The tooth root line is parallel to an element of the face cone.
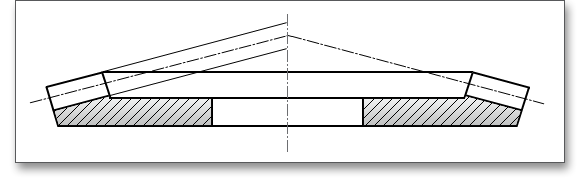
The selection of a proper pressure angle depends on the purpose of the gearing. The most commonly used design pressure angle for bevel gears is \(20^\circ \). The following figures show the tooth form of a spur gear a), b) and c) calculated with identical parameters.

For straight bevel gears, a lower pressure angle leads to higher overlap rates. The default startup
setting for the pressure angle is set to \(\alpha _{n}\) = \(20^\circ \). Other angles may be used, but \(45^\circ \) is the maximum value
that you can enter into the input field. To avoid undercut, the ISO 23509 recommends to use a
nominal pressure angle of \(20^\circ \) or higher for pinions with 14 to 16 teeth and \(25^\circ \) for pinions with 12 or 13
teeth.
The shaft angle \(\Sigma \) of a bevel gear pair is the angle between the intersecting gear axes. The shaft angle can be
between \(0^\circ \) and \(180^\circ \), but the shaft angle of \(90^\circ \) is normally used.
Bevel gears differ with regard to the offset. Bevel gears can have intersecting and non-intersecting axes. Bevel gears without offset have intersecting axes, bevel gears with offset have non-intersecting axes and are hypoid gears. Subsequently, this information refers to a bevel gear without offset, then \( a = 0\).
The number of teeth may influence the tooth profile curvature, tooth depth and the manufacturing of the gearing
(e.g., undercut, pointed teeth). To prevent undercut, the minimum number on the pinion is ‘13’. ‘5’ is the smallest
number you are allowed to enter into the input field. Please keep in mind that the pinion always gets the smaller
number of teeth.
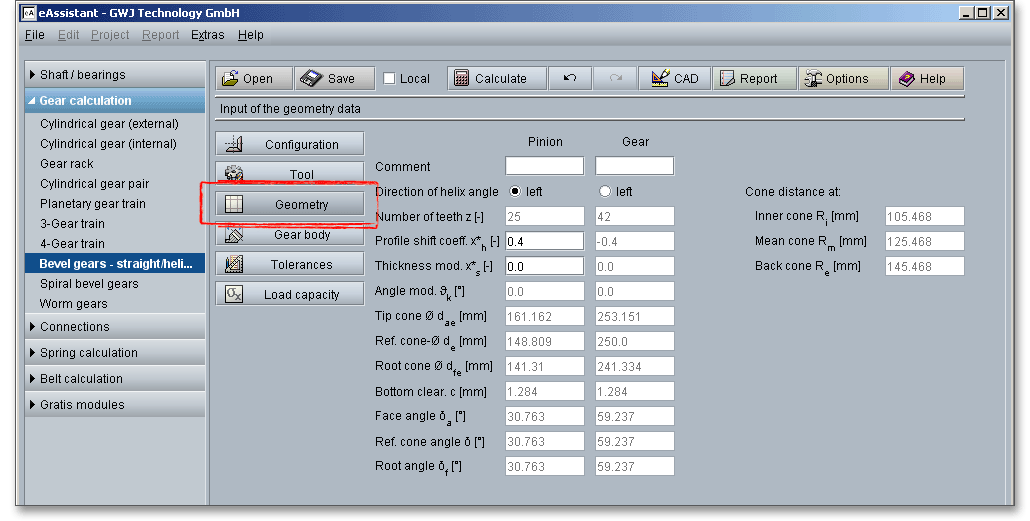
The reference cone diameter \(d_{e}\) is the outer diameter of the reference cone. The reference cone is the reference surface (rotational surface around the gear axis) of a bevel gear, a virtual surface that is used to determine the basic parameters. The reference cone angle \(\delta \) is the angle between the gear axis and the reference cone envelope line. There is a ‘Lock’ button next to the input field for the reference cone diameter. This button can be enabled or disabled. With locking the input field for the reference cone diameter, the input field for the normal module is enabled. Now you can modify both the normal module and the helix angle. Clicking on the ‘Lock’ button next to the input field of normal module or helix angle will enable the input field for the reference cone diameter.
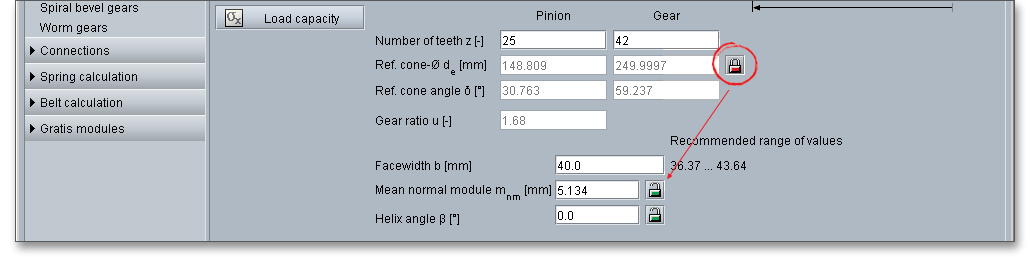
The facewidth \(b\) is dependent upon the kind of application of the gearing and the cone distance at the back cone \(R_{e}\).
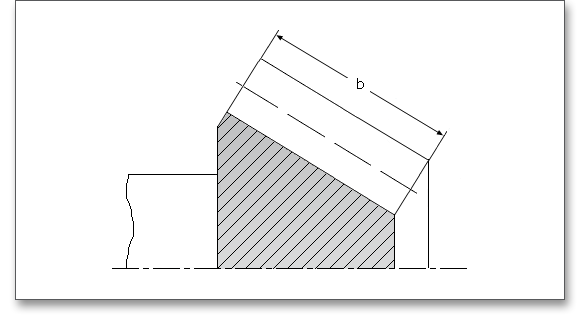
Please note: A facewidth of 25 to 30% of the mean cone distance \(R_{m}\) is a reasonable value for straight bevel gears
that works well in practice.
The normal module \(m_{n}\) is one of the basic parameters for the length dimensions of a bevel gear tooth system. It is specified for a given cone distance. The normal module on the mean cone distance \(R_{m}\) is a common parameter and the value of module is expressed in millimeters. It is recommended to use a module within a range of m = b/8 to b/12. To be on the safe side and to avoid the risk of tooth breakage, you should stay within that value range. It is possible to modify the normal module very easily. Disable the ‘Lock’ button behind the input field for the helix angle. The input field for the helix angle is disabled, the input field for the normal module is enabled. Now you can modify the normal module.

The helix angle \(\beta \) is the acute angle between the tangent to the reference tooth trace and the reference cone
envelope line through the tangent contact point. In straight bevel gears teeth have no helix angle, hence the
helix angle is \(\beta \) = \(0^{\circ }\). For helical bevel gears the teeth are inclined by the angle \(\beta \). The input field for the helix angle
has a ‘Lock’ button to modify the input values. The input field is enabled by default. Click on the ‘Lock’ button, the
input field is diabled and the input field for the normal module is enabled. The normal module and helix angle
affect each other (for a given outer reference cone diameter \(d_{e}\)), so you can optimize the values to meet your
individual requirements.
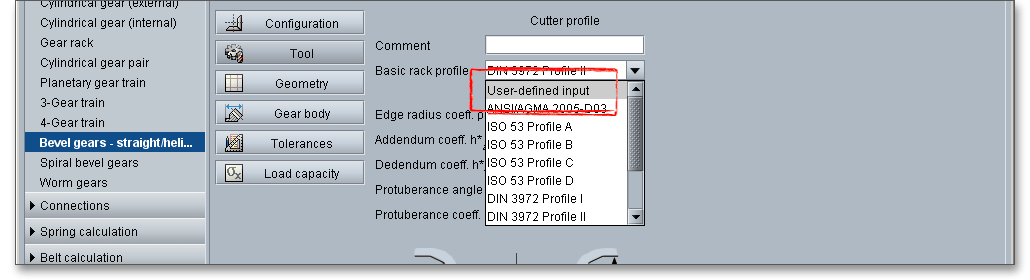
A basic rack profile can be selected from a listbox or can be defined individually by choosing ‘user defined input’. Specific tools can be added to the list as well.
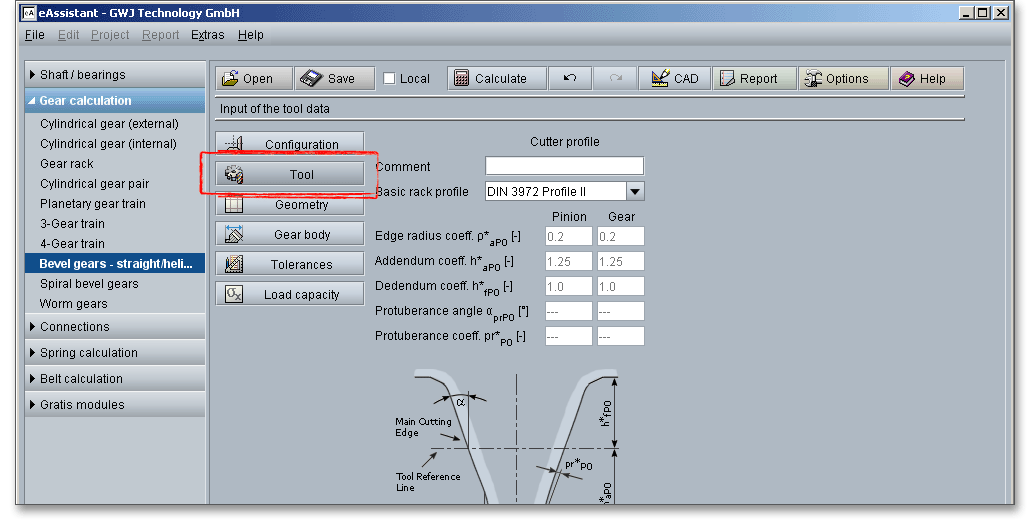
Please note: You can add a description or a short comment to the cutter profile. The notes will appear later in
the calculation report.
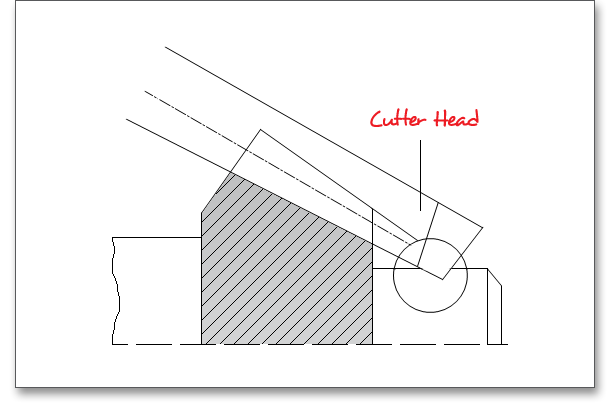
When compared to spur gears, bevel gears are more difficult to manufacture due to their more
complicated geometry (e.g., cone-shaped teeth). The gear tooth form of a bevel gear is an octoidal tooth
form, it is not an involute. Most straight and helical bevel gears are produced by means of cutting
processes like generate planing, hobbing or broaching. Generate planing may be used for small series
production or even for a few pieces. The tooth profile is obtained by using a planing tool with a straight
cutting edge that reciprocates back and forth. The teeth are cut one after the other. The hobbing
process is a much more popular process. The tool consists of two intermeshing milling cutters
representing the crown gear tooth. The cutting edges of the milling cutter alternately machine the tooth
gaps.
In general, a standard basic rack tooth profile according to DIN 867 is used for bevel gears having a constant tooth depth. The normal module is used as a reference length in the middle of the tooth width. The following standard basic rack profiles are available for your calculation. Choose the following profiles from the listbox:
Please Note: If you select ‘user defined input’, then the input fields for the edge radius, the addendum coefficient and the dedendum coefficient are activated. Now it is easy to modify quickly the basic rack profile.
The input mask for the geometry data allows the specification of the helix angle direction as well as the profile shift and thickness modification.
A left-hand pinion comes into mesh with a right-hand gear and vice-versa. When viewed the upright tooth from the reference cone apex and the tooth leans to the right, then the tooth system is right-handed and left-handed when the tooth leans to the left. The helix angle directions of pinion and gear are always opposite. The pinion is usually the driving member of a meshing pair and defines the direction. The direction has no influence on the gear noise or efficiency of the gears.
If you select ‘left’ for the pinion, then the pinion is left-handed and the gear is right-handed. If you select ‘left’ for the gear, then the gear is left-handed and the pinion is right-handed.
The bevel gear tooth system is designed as a gear pair with reference center distance. This means, a bevel gear
with a positive profile shift is always meshed with a bevel gear having an equally large negative profile shift.
Hence, the sum of the profile shift coefficients is 0.
The profile shift is
The following factors may influence the choice of the profile shift:
By using the thickness modification, the tooth root thickness is changed and this automatically changes the
tooth spacewidth. The thickness modification can be selected quite freely and is used to compensate the
differences in the load capacity of the crown gear and the pinion. \(x_{S}^{\ast }\) on pinion and gear is equal. This modification
offers a perfect opportunity to optimize the bevel gear toothing.
By means of the angle modification, the pinion gets an additional profile modification at the small diameter \(R_{i}\) to obtain a better tooth operation and to avoid cutter interference with a hub or shoulder. In general, the value for the angle modification should not exceed \(5^\circ \) and should be used only for special cases.
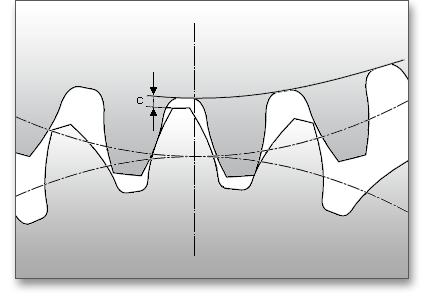
The buttom clearance \(c\) is the minimum distance between the tip of the tooth and root fillet area of the mating tooth. The size of the bottom clearance is usually between 0.2 to 0.3 \(\cdot \) mean normal module.
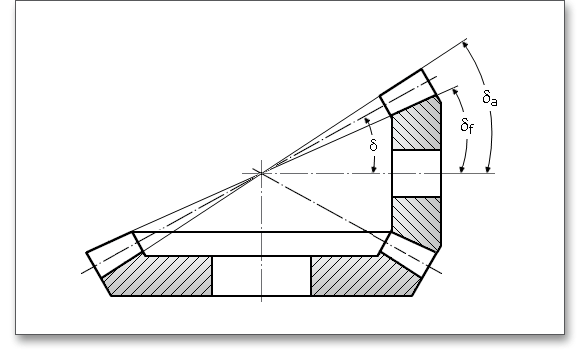
The face angle \(\delta _{a}\) is enclosed by the gear axis and the envelope line of the tip cone. The root angle \(\delta _{f}\) is enclosed by the gear axis and the envelope line of the root cone.
The cone distance \(R\) is the tip distance on the reference cone. The outer cone distance \(R_{e}\) is the length of the envelope lines of the reference cone bounded by the outer reference cone diameter.
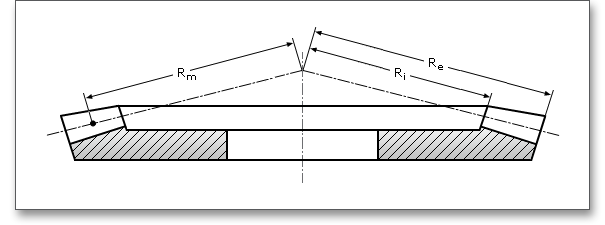
The mean cone distance \(R_{m}\) describes the length of the envelope lines of the reference cone bounded by the mean
reference cone diameter or the outer cone distance diminished by half the facewidth \(b\). The inner cone distance \(R_{i}\)
is the length of the envelope lines of the reference cone bounded by the inner reference cone diameter or the
outer cone distance diminished by the facewidth \(b\).
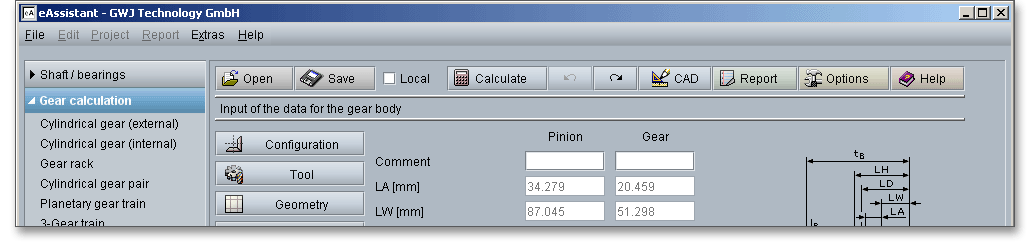
This input mask allows the input of the data for the gear body. This data can be used for the dimension sheet or CAD model. In case a tooth tip chamfering is necessary, then the chamfering is carried out automatically by the eAssistant software. By clicking on the ‘Tooth tip chamfering’ button, the chamfering can be easily modified manually if required.
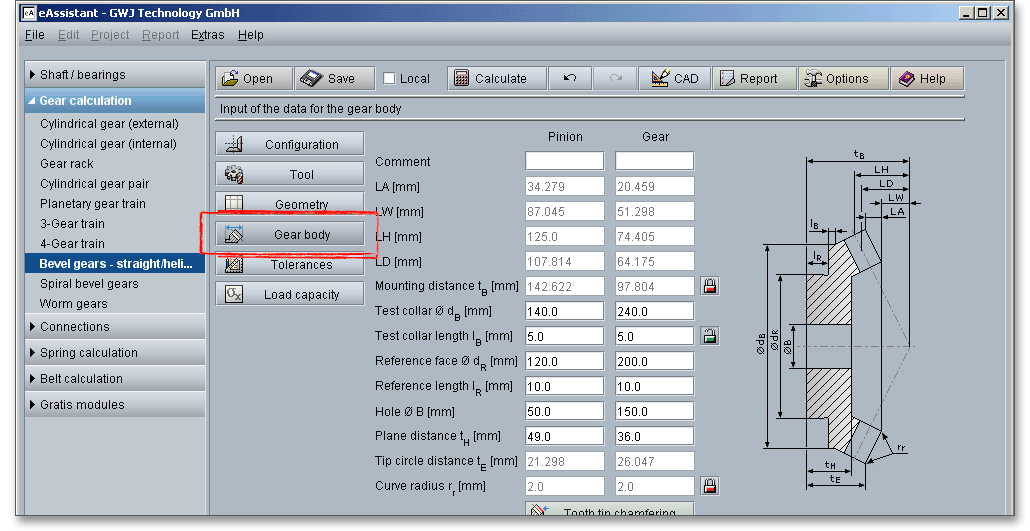
The mounting distance \(t_{B}\) is the distance between the reference cone apex and the reference face. The mounting
distance is required for the manufacturing, testing and mounting process of the bevel gear. There is a
‘Lock’ button next to the mounting distance. This button is disabled by default. By clicking on the
‘Lock’ button, you enable the input field and you can modify the mounting distance. In case the
input for the mounting distance is enabled, the input field for the test collar length is automatically
disabled. If you click again on the ‘Lock’ button next to the test collar length, the input field is enabled
again.
The plane distance is the distance between the reference face and a freely selectable plane perpendicular to the
gear axis and is denoted by \(t_{H}\).
The tip circle distance \(t_{E}\) is the distance between tip circle on the back cone and the reference face.
The Klingelnberg standard provides some reference values for the curve radius \(r_{r}\) at the tooth ends selectable for pinion and crown gear. The curve radius is set automatically by the module according to Klingelnberg. There is the possibility to enable the curve radius using the ‘Lock’ button. Now you can add and modify the curve radius very easily. Click the button again to revert back to the default state.

The following table shows the values set by the module (analogous to Klingelnberg Zyklo-Palloid® spiral bevel gears):
| Typical Values for the Curve Radius \(r_{r}\)1
| ||||||
| \(m_{n}\) | 1.0-2.0 | 2.0-3.5 | 3.5-5.0 | 5.0-6.0 | 6.0-7.0 | 7.0-9.0 |
| \(r_{r}\) | 0.5 | 1.0 | 1.5 | 2.0 | 2.5 | 3.0 |
| 1 from: Klingelnberg KN3028: Auslegung eines Kegelradgetriebes
ohne Achsversatz mit Klingelnberg Zyklo-Palloid® -Verzahnung,
p. 33
| ||||||
| Typical Values for the Curve Radius \(r_{r}\)1
| ||||||
| \(m_{n}\) | 9.0-10 | 10-13 | 13-14 | 14-16 | 16-19 | 19-25 |
| \(r_{r}\) | 3.5 | 4.0 | 4.5 | 5.0 | 5.5 | 6.0 |
| 1 from: Klingelnberg KN3028: Auslegung eines Kegelradgetriebes
ohne Achsversatz mit Klingelnberg Zyklo-Palloid®-Verzahnung, p.
33
| ||||||
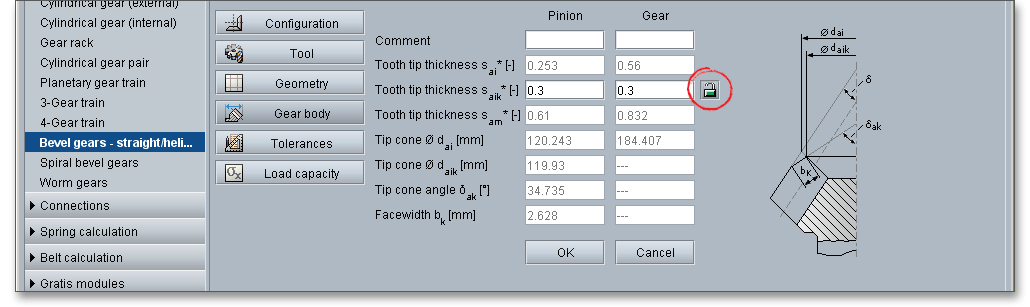
If the tip tooth thickness \(s_{a}\) is smaller than \(0.3 \cdot m_{n}\), a tooth tip chamfering has to be carried out to avoid the through-hardening. The risk of having a pointed tooth occurs at the smaller diameter of the pinion. For the tooth tip chamfering the face angle \(\delta _{ak}\) is increased along the facewidth \(b_{k}\) so that an approximately constant tooth tip thickness of \(0.3 \cdot m_{n}\) is obtained in this area.
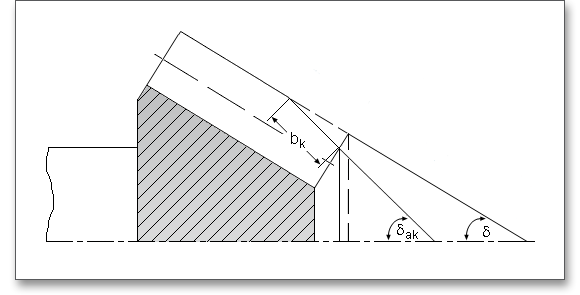
The tooth tip chamfering is carried out automatically by the eAssistant software. If this is the case, you will receive a note in the message window. By clicking on the ‘Tooth tip chamfering’ button, the values for the chamfering are displayed. By clicking on the ‘Lock’ button, you can define the tooth tip thickness \(s_{aik}\) and therefore influence the tooth tip chamfering. Click the ‘Lock’ button again to revert back to the default state.
In addition to the class of shaft position accuracy, the calculation module provides proposals for the amount of backlash according to Klingelnberg or Niemann. A backlash can be defined individually as well.
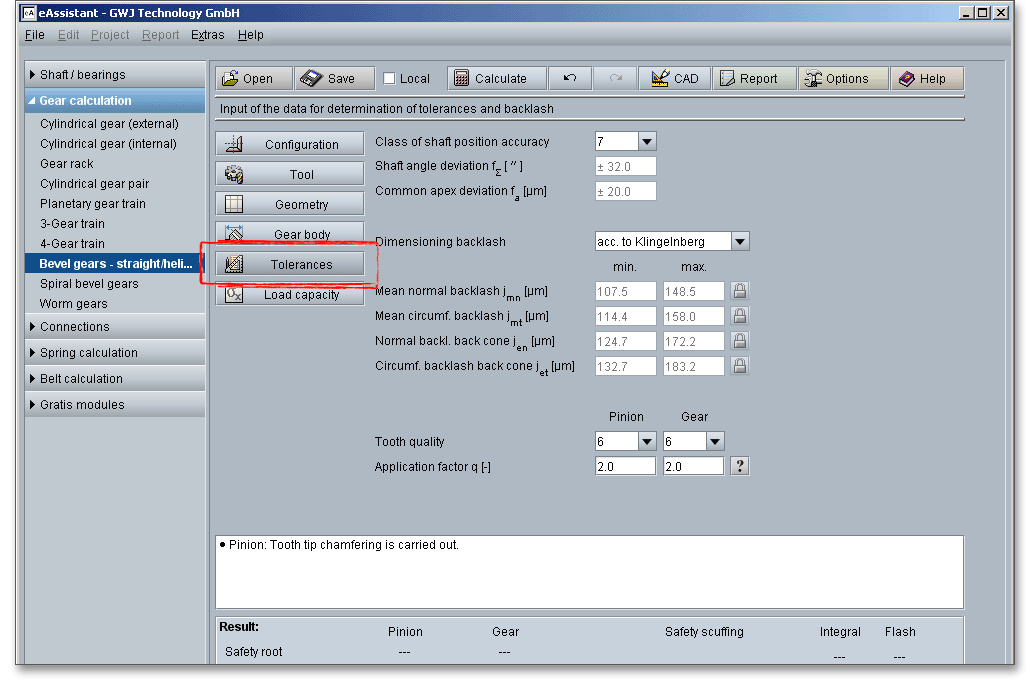
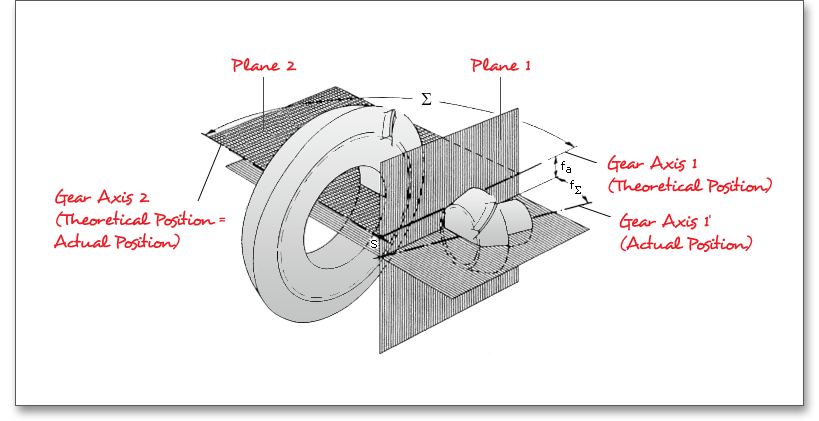
The shaft angle deviation \(f_{\Sigma }\) describes the difference between the shaft angle of both gear axes in their actual position and the theoretical value of this angle. The common apex deviation \(f_{a}\) of a bevel gear pair is the crossing distance of both gear axes in their actual position. The class of shaft position accuracy determines the shaft angle deviation and the common apex deviation. The calculation is in accordance with DIN 3965.
The general purpose of backlash is to prevent the gears from jamming and manufacturing inaccuracies. For that
a proper backlash must be provided.
Errors in machining influence the smooth and continuous tooth action. That makes it necessary to provide a
circumferential backlash to avoid jamming or interferences of the gearing. But please keep in mind that a small
circumferential backlash can cause jamming and using a too large circumferential backlash weakens the tooth
thickness. The choice of the right backlash will depend upon a number of factors, including the size of the
gearing, the tooth quality as well as the case of application. The normal and circumferential backlash are
determined according to Klingelnberg or Niemann. The corresponding method can be selected from the
listbox.
Select the option ‘user defined input’ from the listbox. Now you are able to enter your individual backlash. Click the ‘Lock’ button to enable the input field and to specify your own value. If you select again one of the methods, then the ‘Lock’ button and the input fields are disabled.

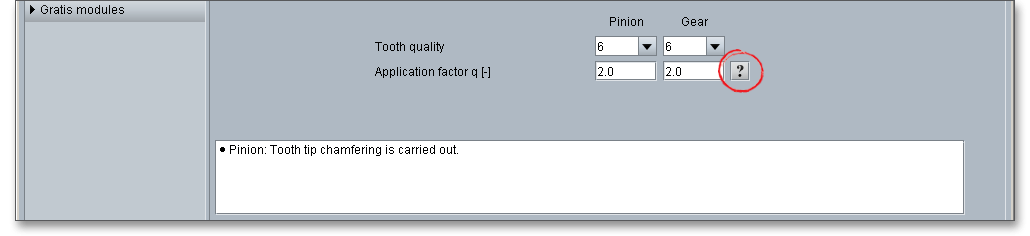
The ISO 17485 defines ten accuracy grades, numbered 2 to 11 in order of decreasing precision. Accuracy grade ‘2’ describes the highest possible accuracy, ‘11’ is the lowest accuracy.
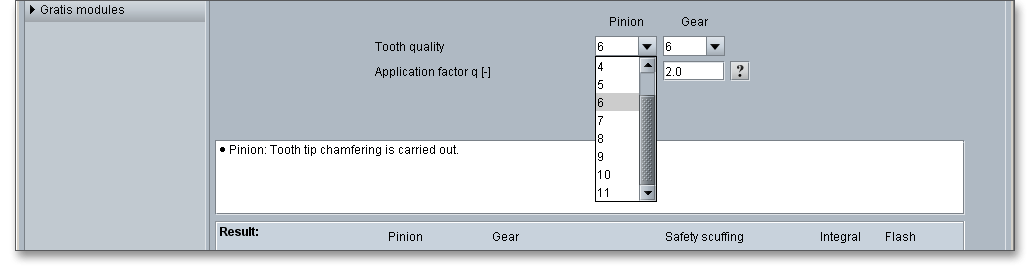
ISO 17485 uses the application factor \(q\) in order to determine appropriate tolerance values for a required accuracy grade. To avoid gear noise or prevent premature gear failure, the reference values for the application factor that are shown in the following table should be used. Click the ’Question mark’ button to open the following table.
| Typical Values for the Application Factor \(q\) According to ISO2
| ||
| Application | Typical Values for Amplitudes of Single Flank Composite Tooth Mesh Component Deviations | Factor \(q\) |
| Passenger car | < 30 | 0.05 |
| Truck | 20 - 50 | 1.0 |
| Industrial | 40 - 100 | 2 to 2.5 |
| Aircraft | 40 - 200 (80 average) | 2.0 |
| 2 from: ISO 17485: Bevel Gears - ISO System of Accuracy, p. 26, table B.1
| ||
Gears fail by tooth breakage, pitting as well as by scuffing. The strength is determined by the loads, the geometry of gearing as well as selected materials. The calculation of the load capacity is about the proof of the following strength factors that result from the above-mentioned forms of damage:
Use the eAssistant software to check the load capacity of tooth root and tooth flank. The calculation of the scuffing load capacity is not yet available. The material properties, endurance as well as the kind of lubrication and the lubricant will be considered in the calculation. There are extended input options to influence the number of load changes or the roughness, the mode of operation can be selected.
The following factors consider the influences of the load capacity calculation:
Tooth breakage is a fatigue failure. Pitting, scuffing or wear may weaken the tooth so that it breaks. The slow
progress of the fracture apparently causes the metal to break like brittle material. A tear or grinding notch may
cause a tooth breakage. Gear-tooth fractures ordinarily start in the root fillet. The tooth breakage can destroy an
entire gearing and leads to a failure of the gearing. Sometimes a new tooth will break as a result of severe
overload or a serious defect in the tooth structure. According to DIN 3990, an operation with a reduced load is
possible after a tooth breakage, if just a small portion of a tooth broke off and the other parts of the gearing are
intact.
For a high load capacity of the tooth root, the following methods are advantageous: positive profile shift (for
small number of teeth), usage of hardened and tempered or case-hardened materials with larger load capacity
of the tooth root, larger root fillet, larger module
Pitting is a fatigue failure and is characterized by little bits of metal breaking out of the surface and thereby
leaving small holes or pits, so that oil seeps into the pits. This is caused by high tooth loads leading to excessive
surface stress, a high local temperature due to high rubbing speeds or inadequate lubrication. The
cracking of the surface develops, spreads and ultimately results in small bits breaking out of the tooth
surface. But it is often possible to get some years of service out of gears that have pitted rather
extensively.
For a high load capacity of the tooth flank, the following methods are advantageous: large number of teeth,
positive profile shift (for small number of teeth), higher pressure angle, large hardness of tooth flank, nitriding,
more viscous oil
Scuffing is a surface destruction and it can be caused by a lubrication failure. Tears and scratches appear on the rubbing surface of the teeth. This form of damage is called ‘scuffing’. The terms of ‘scuffing’ and ‘scoring’ are used interchangeably. Scuffing is an important form of damage leading to component replacements in lubricated mechanical systems. Compared with tooth breakage and pitting, it is not a fatigue failure, it can come very quickly. A short overload can lead to scuffing and the gearing fails. Scuffing is apt to occur when the gears are first put into operation because the teeth have not sufficient operating time to develop smooth surfaces. Due to the scuffing, the temperature, the forces and the noise increase, the gear teeth finally break off. The following factors may influence the occurrence of scuffing:
After the occurrence of scuffing, high-speed gears apt to additional dynamic forces that cause usually pitting or tooth breakage. The high surface temperature may cause a breakdown of the lubricating film. The following factors support scuffing:
For a high scuffing load capacity, the following methods are advantageous: E.P. oils (oil that contains chemical
additives), a careful running-in period of the gearing, low sliding velocity due to tip relief and a smaller
module
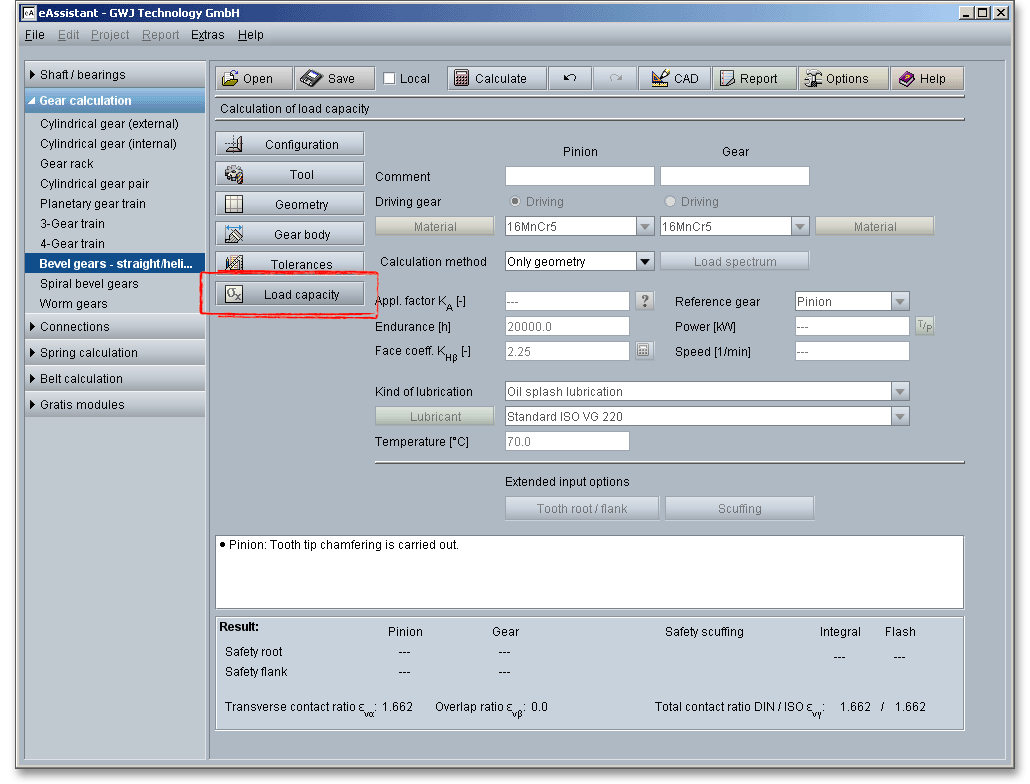
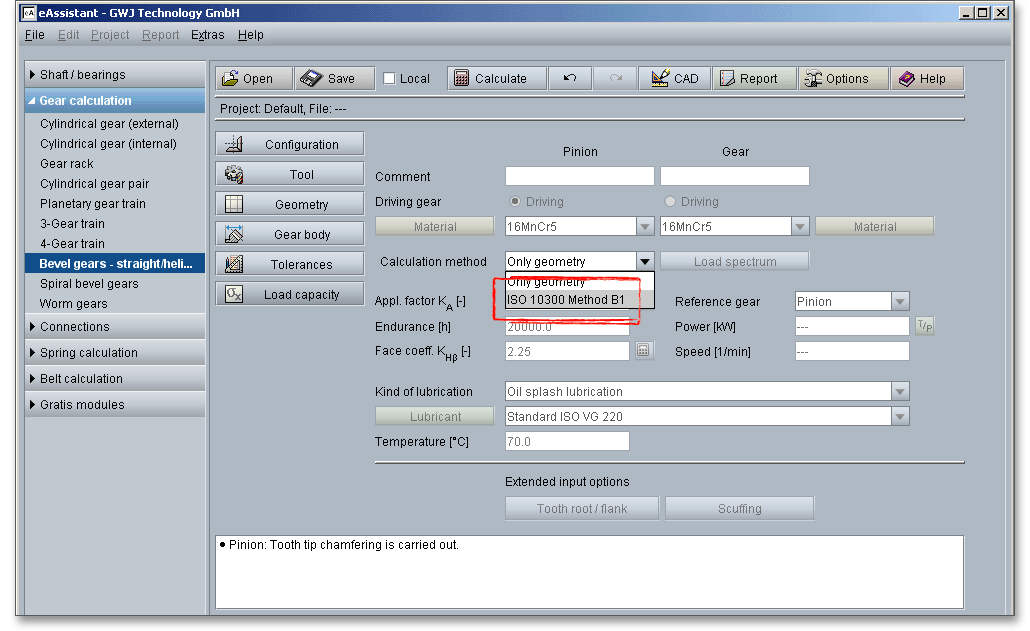
Click on the button ‘Load capacity’ to get to the calculation mask. You will notice that all input fields or listboxes are disabled. When you select the entry ‘ISO 10300 Method B1’ from the listbox ‘Calculation method’, all input fields are enabled. In case you do not need the calculation for the load capacity, the calculation can be deactivated. Thus, the size of the calculation report becomes smaller.
You can add a description or a short comment to gear 1 and gear 2.

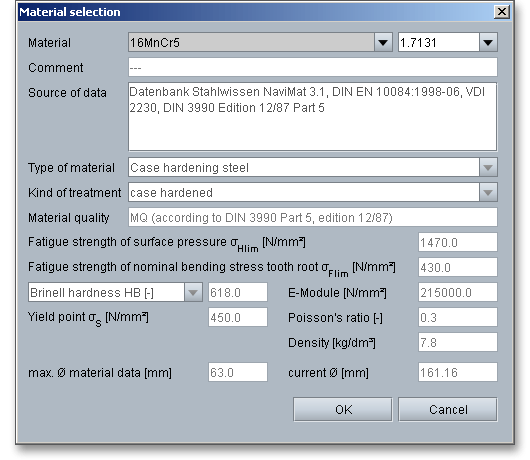
Select an appropriate material directly from the listbox. Clicking the button ‘Material’ opens the material database.
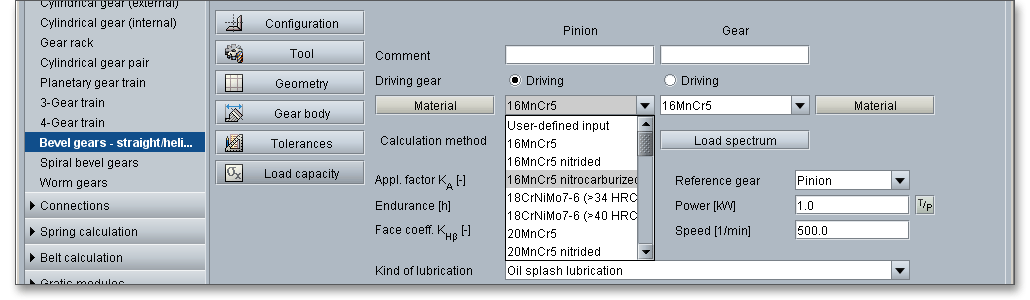
The material database provides some detailed information on the several kinds of material. If the listbox is active, the two arrow keys ‘Up’ and ‘Down’ of your keyboard allows you to search through the database, so you can compare the different values with each other.
In order for gears to achieve their intended performance, life and reliability, the selection of a suitable material is
very important. Steel is the most common material that is used for gears. There are a number of steels used for
gears, ranging from plain carbon steels through the highly alloyed steels from low to high carbon
contents. The choice will depend upon a number of factors, including size, service and design.
For pinion and gear, the same hardened and tempered steel may be used. It has to be kept in
mind that unhardened gears with equal hardness should not be meshed with each other because
scuffing is apt to occur. A hardened or nidrided gear \(HRC > 50\) smoothes the tooth flanks of the hardened and
tempered mating gear, reduces the form deviations and increases the load capacity of the tooth
flank. For a mating of hardened gears, no hardness difference is necessary. The final selection of
the material should be based upon an understanding of the material properties and application
requirements.
Steel casting: Steel casting belongs to the ferrous metals that include carbon (up to max. 2%) and are poured into sand molds to produce several components. Due to a higher melting temperature, steel casting is more difficult to cast than cast iron. Steel casting is cheaper than ground or forged gears.
Steel: Steel is the most common material and is used for medium and high-loaded gears.
Nidrided steel: Nitriding is adding nitrogen to solid iron-base alloys by heating the steel in contact with
ammonia gas or other suitable nitrogenous material. This process is used to harden the surface of
gears.
Case-hardened steel: Case-hardened steel is a quality and high-grade steel with low carbon content.
Case-hardened steel is usually formed by diffusing carbon (carburization), nitrogen (nitriding) into the outer layer
of the steel at high temperature and then heat treating the surface layer to the desired hardness. When the steel
is cooled rapidly by quenching, the higher carbon content on the outer surface becomes hard while the core
remains soft and tough.
Blackheart malleable cast iron (pearlitic structure): Malleable cast iron is a heat-treated iron carbon alloy. Two
groups of malleable cast iron are specified, whiteheart and blackheart cast iron. Blackheart malleable cast iron
is used for parts with a complex shape, in which a high durability, shock resistance and good machining are
important. Malleable cast iron is used for smaller dimensions and has got a higher strength and toughness than
steel castings.
Cast iron with spheroidal graphite (pearlitic structure, bainitic structure, ferritic structure): Cast iron usually refers
to gray cast iron but identifies a large group of ferrous alloys that contain more than 2% of carbon. It is extremely
rare that the maximum carbon content is higher than 4.5%. Cast iron is a low-priced material. However, cast iron
has less toughness and ductility than steel. Cast iron with spheroidal graphite can be used for parts with higher
vibration stress.
Heat-treated steel: Hardening and tempering is a heat-treating technique for steels by quenching from the
hardness temperature and annealing at a high temperature so that the toughness is increased significantly. At
the same time, a higher elastic limit is reached. Annealing temperatures and times differ for different
materials and with properties desired, steel is usually held for several hours at about \({400^\circ }C\) to \({700^\circ }C\). Some
steels have to be cooled very quickly (Annealing: in order to achieve the intended properties of work
pieces (e.g., desired strength or toughness), reheating of the work pieces to certain temperatures is
necessary.).
Gray cast iron: Gray cast iron is used for complex shapes and offers low cost and an easy machinability. It
provides excellent damping properties but it is a disadvantage that the load capacity is very low.
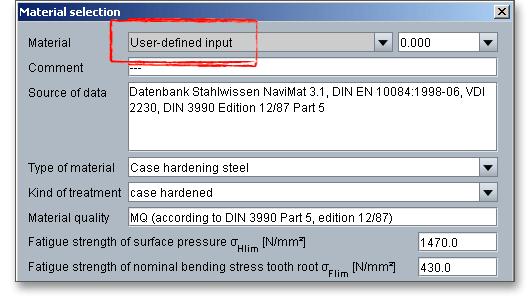
In case there is no material that will fulfill the design requirements, then simply define your individual material. Select the option ‘User defined input’ and all inputs and options are activated and you can specify your individual material very easily. Your inputs will be saved to the calculation file. Please be advised that changing the material will delete your defined inputs and you have to enter the inputs again.
The application factor \(K_{A}\) evaluates the external dynamic forces that affect the gearing. These additional forces are largely dependent on the characteristics of the driving and driven machines as well as the masses and stiffness of the system, including shafts and couplings used in service. Because scuffing is not a fatigue failure, the application factor shall consider the stronger influence of several load peaks during the calculation of the scuffing load capacity. Several load peaks affect directly only the flank temperature. Because of that, the same application factor \(K_{A}\) can be used for the calculation of the scuffing load capacity as well as of the load capacity of the tooth root and tooth flank. The application factor is determined by experience. An application factor of ‘1.0’ is best thought of a perfectly smooth operation. The following table gives some values according to DIN 3990.
| Application Factors \(K_{A}\) According to DIN 3990-1: 1987-125
| ||||
| Working Characteristics | Working Characteristics of the Driven Machine | |||
| of the Driving Machine | Uniform | Light shocks | Moderate shocks | Heavy shocks |
| Uniform | 1.0 | 1.25 | 1.5 | 1.75 |
| Light shocks | 1.1 | 1.35 | 1.6 | 1.85 |
| Moderate shocks | 1.25 | 1.5 | 1.75 | 2.0 |
| Heavy shocks | 1.5 | 1.75 | 2.0 | 2.25 or higher |
| 5 from: DIN 3990 Part 1, December 1987, p. 55, table A1
| ||||
Please Note: You will find a ‘Question mark’ button next to the input field. Click on this button and the above-mentioned table opens. The ‘Question mark’ button is an additional feature and provides further information. You will find this button next to several input fields.

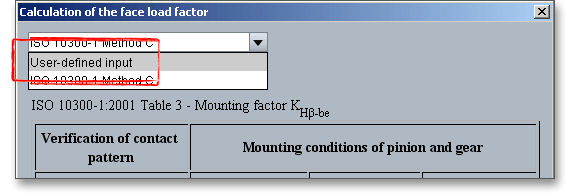
The face load factor takes into account the effects of the non-uniform distribution of load over the gear facewidth on the surface stress \(K_{H\beta }\), on the tooth root stress \(K_{F\beta }\) and on the scuffing \(K_{B\beta }\). The face load factor can be entered manually or can determined according to ISO 10300 Part 1 Method C. Click on the ‘Calculator’ button to open the input mask for the face load factor.

The listbox already displays the entry ‘ISO 10300 Part 1 Method C’ and the input field for the mounting factor \(K_{H\beta -be}\) is active. The table provides some reference values for the mounting factor \(K_{H\beta -be}\). Enter a value from this table into the input field click the button ‘Ok’. The face load factor is determined and applied automatically to the main mask.
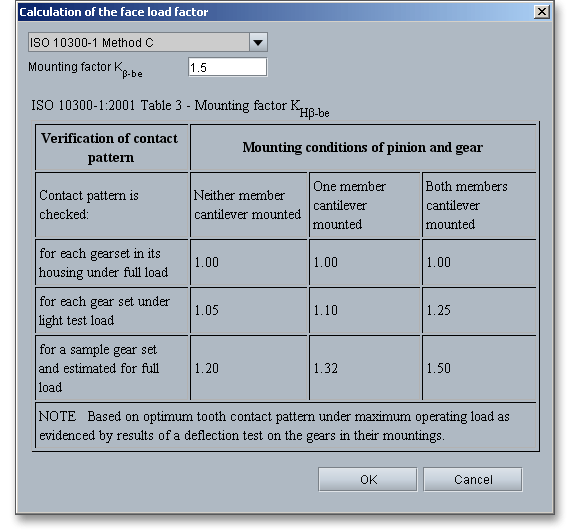
The following table shows reference values for the mounting factor. The influence of the deflections, and thus of the bearing arrangement, is accounted for by the mounting factor \(K_{H\beta -be}\):
| Reference Values for the Mounting Factor \(K_{H\beta -be}\)6
| |||
| Verification of the Contact Pattern | Mounting Conditions of Pinion and Gear
| ||
| Neither Member Cantilever Mounted | One Member Cantilever Mounted | Both Members Cantilever Mounted |
|
| For each gear set in its housing under full load | 1.00 | 1.00 | 1.00 |
| For each gear set under light test load | 1.05 | 1.10 | 1.25 |
| For sample gear set and estimated for full load | 1.20 | 1.32 | 1.50 |
| 6 from: ISO 10300 Part 1, 2001, p. 26, table 3
| |||
In case you already use a defined face load factor, you can enter this factor. Simply click on the ‘Calculator’ button to open the window for the determination of the face fload factor. Select ‘User-defined input‘ from the listbox and click on the ‘OK’ button.
The input field for the face load factor is enabled and you can add your own values. If you need this factor for several calculations, we recommend you to define a template file. That saves both time and work. Enter the value for the face load factor and click on the ‘Save’ button. Please name the file ‘standard’. If you now open the eAssistant software, then module starts with your defined face load factor.

Lubrication serves several purposes but its basic and most important function is to protect the sliding and rolling tooth surfaces from seizing, wear and friction. The friction of the tooth flank is responsible for flank wear, gear heating and gear noise. A reduced flank friction improves the efficiency that is dependent on the tooth load, circumferential velocity, gear quality and the surface condition of the tooth flanks. In order that the gearing should work properly, the selection of a lubricant is an important choice. A liquid lubricant is a good choice and can be easily introduced between the contacting surfaces. In addition, a lubrication has to reduce frictional heat and has to protect the surfaces against corrosion. The bearings and clutches in a gearing require also an appropriate lubricant. Therefore, the lubricant has to be suitable as well. Oil and greases are the most common lubricants.

Liquid lubricants may be characterized in many different ways. Viscosity is one very important property of a
lubricant and determines the oils lubricating efficiency. For the selection of liquid lubricants applies:
the smaller circumferential velocity and larger the contact pressure as well as the roughness of
tooth flanks, the higher the viscosity. A higher viscosity will result in a higher hydrodynamic load
capacity and an increased scuffing load limit where scratching and scuffing of the tooth flanks occur.
(Muhs/Wittel/Jannasch/Vossiek: Roloff/Matek Maschinenelemente, 17th revised edition, published by Vieweg,
Wiesbaden 2005.)
Please Note: If the viscosity is too low, the oil film will not be sufficiently formed and if the viscosity is too high,
the viscosity resistance will also be high and cause temperature rise. For higher speed, a lower viscosity oil
should be used and for heavy loads, a higher viscosity oil should be used.
Gears that are running primarily in a gearbox are lubricated with oil. A distinction is made between oil splash
lubrication and oil injection lubrication.
Oil splash lubrication: The oil splash lubrication is an easy, reliable and reasonable lubrication system.
It is a type of lubrication used in enclosed gear drives. In splash lubrication, the gear tooth dips
into a tray of lubricant and transfers the lubricant to the meshing gear as it rotates. As a result, oil
reaches all of the places where it is needed. The oil splash lubrication can be used for average speed
applications.
Oil injection lubrication: With the oil injection lubrication, the oil can be filtered, cooled and checked and the oil is
directly fed to the bearings. The amount of oil can be controlled according to the heat dissipation requirements.
The gearbox is used as an oil tank reservoir from which several units can be supplied. The oil is sprayed directly
by a pump injector into the mating surfaces.
Grease lubrication: The selection of the grease is dependent upon the circumferential velocity, the kind of
application and the service temperature. A grease lubrication requires low maintenance and protects against
contamination. Grease lubrication is suitable for any gear system that is opened or enclosed, so long as it runs
at low speed. The grease should have a suitable viscosity with good fluidity especially in a enclosed gear
unit.
Select an appropriate lubricant directly from the listbox or click on the button ‘Lubricant’ to open the lubricant database.

The database provides some detailed information on the lubricants (e.g., density, viscosity, load stage of FZG test). Select the entry ‘user defined input’ to enable the input fields and to enter your own value based on your experience.

The main mask of the load capacity provides the button ‘Tooth root/flank’, click on that button and the extended input options appear.

If you do not change any inputs in the following mask, then the default input values are used.
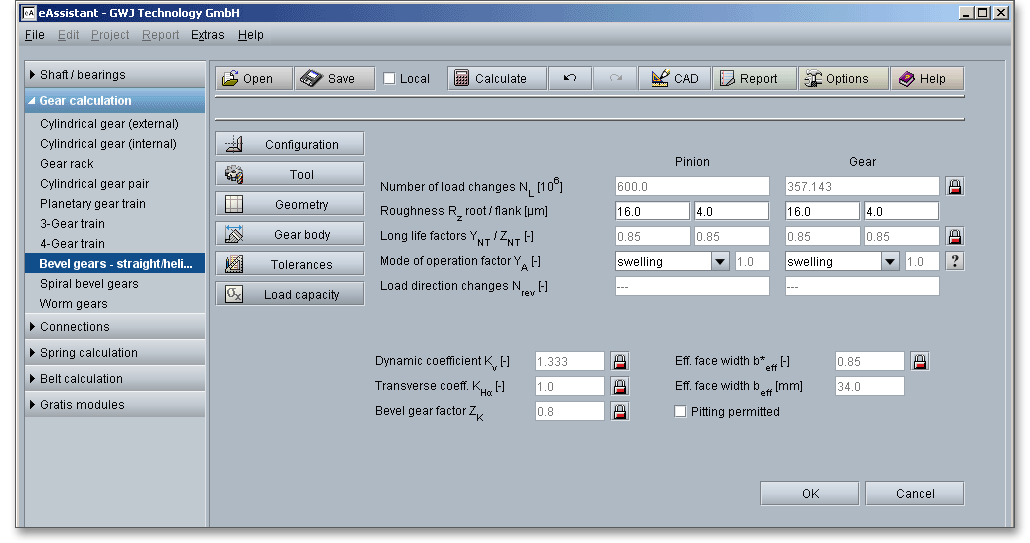
The surface roughness of the tooth flanks influences the load capacity of the tooth flanks. The average roughness \(R_{z}\) is the arithmetic average of five individually measured roughness values. The input of the roughness occurs for root and flank of pinion and gear. The right choice of the surface roughness is determined by economical aspects depending upon the intended purpose and manufacturing process. A fine surface can be very expensive because of the high manufacturing costs. A surface that is too rough may not fulfill the required functionality.

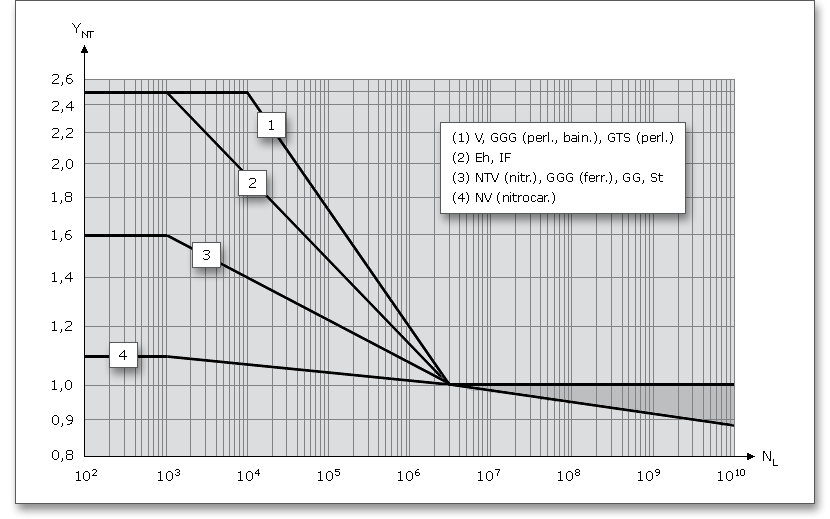
The long life factor \(Y_{NT}\) accounts the higher tooth root stress and the long life factor \(Z_{NT}\) accounts the higher contact
stress including static stress, which may be tolerable for a limited life (number of load cycles). The main
influences to \(Y_{NT}\) and \(Z_{NT}\) are material and heat treatment.
Long life factor \(Y_{NT}\):
With optimum lubrication, material and manufacturing \(Y_{NT}\) = 1.0 may be used for the number of load cycles \(N_{L} = 3 \cdot 10^{6}\). For
static stresses \(N_{L} \leq 10^{3}\), the long life factor is 2.5.
Long life factor \(Z_{NT}\):
With optimum lubrication, material and manufacturing \(Z_{NT}\) = 1.0 may be used for the number of load cycles \(N_{L} = 5 \cdot 10^7\). For
static stresses \(N_{L} \leq 10^{5}\), the long life factor is 1.6.
The following figures show the factors \(Y_{NT}\) and \(Z_{NT}\) for the static and endurance stresses depending on heat treatment and material.

Use the ‘Lock’ button next to modify the long life factors \(Y_{NT}\) and \(Z_{NT}\). The input fields are enabled and you can define
your own value for the factors. Please remember to keep the modified input field open or the default values will
be used again.
The fatigue strength of the tooth root \(\sigma _{Flim}\) is corrected with the influence of the mode of operation.
\[\sigma _{Flim} = \sigma _{Flim0} Y_{A}\]
| \(\sigma _{Flim0}\) | Fatigue strength of the tooth root from material data |
| \(\sigma _{Flim}\) | Fatigue strength of the tooth root with influence of the mode of operation factor |
| \(Y_{A}\) | Mode of operation factor (see following table) |
The following table provides some guideline values for the mode of operation factor \(Y_{A}\):
| Mode of Operation Factor \(Y_{A}\) According to Linke7
| ||
| Mode of Operation | Mode of Operation Factor \(Y_{A}\) | Direction of Load |
| Swelling | 1 | 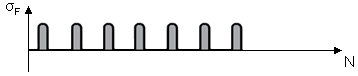 |
| Alternating | 0.7 | 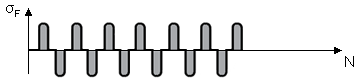 |
| Oscillating | 0.85 - 0.15 \(\frac {lgN_{rev}}{6}\) (for \(1\leq N_{rev} \leq 10^{6}\)) 0.7 (for \(N_{rev} > 10^{6}\)) | 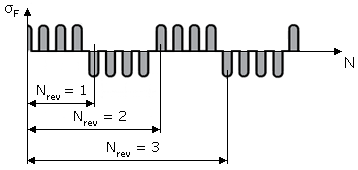 |
| Please Note: \(N_{rev}\) = Number of load direction changes during operation time
| ||
| 7 from: Linke, H.: Stirnradverzahnung Berechnung Werkstoffe Fertigung, Carl Hanser Verlag
Muenchen Wien, 1996, p. 321, table 6.5/7
| ||
Clicking the ‘Question mark’ button allows you to open the table above.

The dynamic coefficient \(K_{V}\) considers additional inner dynamic forces. Inner dynamic forces are caused by mesh alignments, lead crowning, deformation of teeth, the housing, shafts and gear bodies as well as oscillation of the wheel masses. As the circumferential velocity of the gear rim increases, the dynamic forces increase. The forces decrease with an increasing load of the teeth. Click on the ‘Lock’ button to enable the input field and enter your own value.

The transverse coefficients account for the effect of the non-uniform distribution of transverse load between
several pairs of simultaneously contacting gear teeth on the surface pressure (\(K_{H\alpha }\)), stress leading to scuffing (\(K_{B\alpha }\)) and
loading of the tooth root (\(K_{F\alpha }\)). Click on the ‘Lock’ button to enable the input field and enter your own
value.
The factor \(Z_{K}\) is an empirical factor which accounts for the difference between bevel- and cylindrical-gear loading in
such a way as to agree with practical experience. It is a stress adjustment constant which permits the rating of
bevel, spur and helical gears, with the same allowable contact stress numbers for any material. The
eAssistant software uses \(Z_{K}\) = 0.8 for bevel gears. Click the ‘Lock’ button to modify the bevel gear
factor.
\(b_{e}\)is effective facewidth (real length of contact pattern). In the case of full load, the contact pattern typically has a minimum length of 85% of facewidth. If it is not possible to obtain information of pattern length under load conditions, \(b_{e} = 0.85 \cdot b\) should be used. Click the ‘Lock’ button to enter the factor for effective facewidth.

In specific cases, the development of pits on the gear flank is allowed. Use this option to permit several pits. In general, initial pitting is considered normal and is not a cause for concern. In particular, case-hardened and nitrided gears usually has the tendency to pit near the tooth root and lead eventually to fatigue breakage. Here an individual assessment is necessary. In some cases (aerospace industry), pits are absolutely not permitted. For turbo transmissions, pits may lead to oscillations and increased additional dynamic forces.

The calculation module provides a message window. This message window displays detailed information, helpful hints or warnings about problems. One of the main benefits of the program is that the software provides suggestions for correcting errors during the data input. If you check the message window carefully for any errors or warnings and follow the hints, you are able to find a solution to quickly resolve calculation problems.

The quick info tooltip provides additional information about all input fields and buttons. Move the mouse pointer over the input field or button, then you will get the additional information. This information will be displayed in the quick info line.
All results will be calculated during every input and will be displayed in the result panel. A recalculation occurs after every data input. Any changes that are made to the user interface take effect immediately. In case a minimum safety is not fulfilled, the result will be marked red. Press the Enter key or move to the next input field to complete the input. Alternatively, use the Tab key to jump from field to field or click the ‘Calculate’ button after every input. Your entries will be also confirmed and the calculation results will displayed automatically.

The ‘Report’ button enables you to generate a calculation report.

The calculation report contains a table of contents. You can navigate through the report via the table of contents that provides links to the input values, results and figures. The report is available in HTML and PDF format. Calculation reports, saved in HTML format, can be opened in a web browser or in Word for Windows.
You may also print or save the calculation report:
When the calculation is finished, it is easy to save the calculation. You can save your calculation either to the eAssistant server or to your computer. Click on the button ‘Save’.

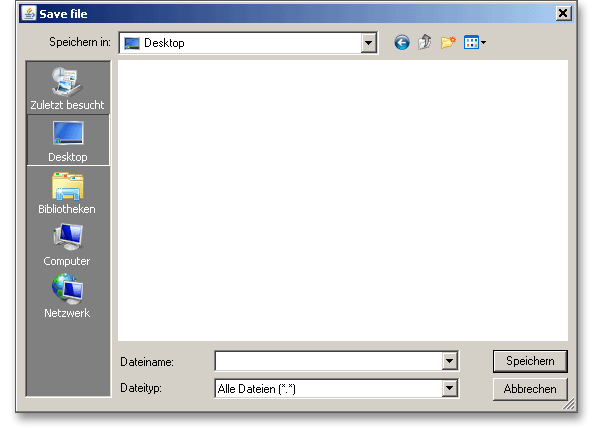
Before you can save the calculation to your computer, you need to activate the checkbox ‘Local’ in the calculation module. A standard Windows dialog for saving files will appear. Now you will be able to save the calculation to your computer.
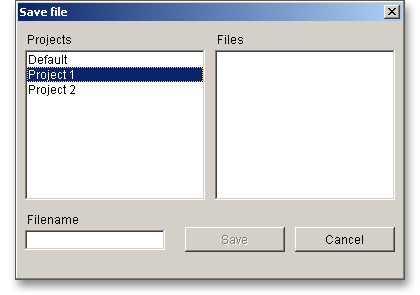
In case you do not activate the option in order to save your files locally, then a new window is opened and you can save the calculation to the eAssistant server. Please enter a name into the input field ‘Filename’ and click on the button ‘Save’.
The ‘Undo’ button allows you to reset your inputs to an older state. The ‘Redo’ button reverses the undo.

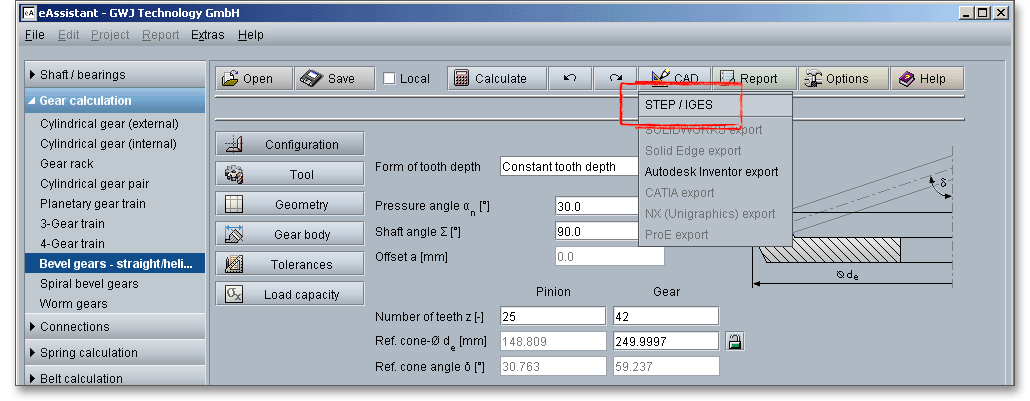
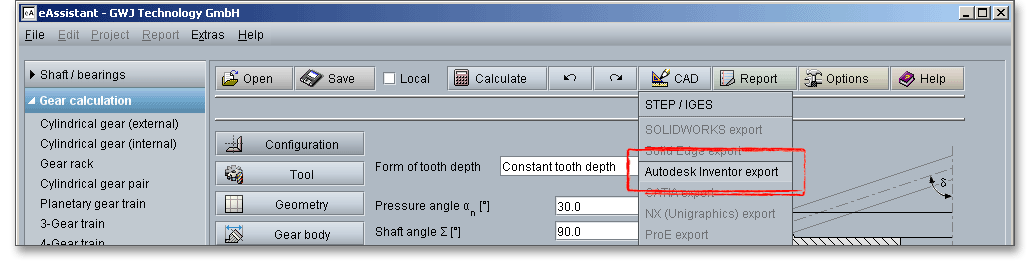
The top menu bar of the eAssistant software provides the button ‘CAD’.

The eAssistant plugin for various CAD systems (e.g., SOLIDWORKS, Solid Edge or Autodesk Inventor) enables
you to combine calculation and design very easily. On the basis of the eAssistant calculation, you can create
bevel gears as a 3D part within seconds.
Using this function allows to create the geometry of straight and helical bevel gears as 3D CAD models in STEP or IGES format. STEP as well as IGES are two standardised neutral file formats for CAD models. Almost every 3D CAD system can import STEP files.
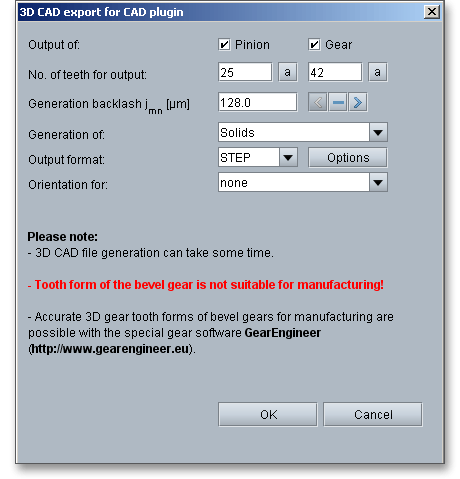
The settings menu for the STEP and IGES output has a few different functions and allows to adjust the export options as needed. The geometry can be generated as a solid model with one or all teeth or as a surface model of the tooth space geometry. When exporting to a CAD system, you can also set the level of accuracy to a desired value.
The eAssistant plugin for various CAD systems (e.g., SOLIDWORKS, Solid Edge, Autodesk Inventor) enables you to combine calculation and design very easily and fast. Based on your eAssistant calculation, you can generate straight and helical gears as a 3D part within seconds. A single menu pick in the eAssistant software transfers the eAssistant calculation data to the CAD system. Based on these parameters, the automatic creation of a 3D parametric model starts in the CAD system. Allowances, addendum chamfer, profile shift are taken into consideration.
The CAD model stores all features and dimensions as design parameters. The eAssistant calculation is linked
and associated to the part and can be opened at any time throughout the entire design phase.
This is also possible if one part contains different calculations. Click the button ‘CAD’ and select
the CAD plugin. Open the CAD system and start the generation by clicking the integrated button
‘eAssistant’.
Please note: First you need to download and install the right CAD plugin for your CAD system. The plugin is
available on our web site www.eAssistant.eu. After installation, an integrated button called ‘eAssistant’ appears
in the CAD system.
With just one click, the design table with all manufacturing details can be placed on the sheet. The appearance
and size of that table is individually configurable. There is no need to manually add all design table parameters
to the drawing.
Please note: For further information, please visit our web site www.eAssistant.eu or read the CAD plugin
manual.
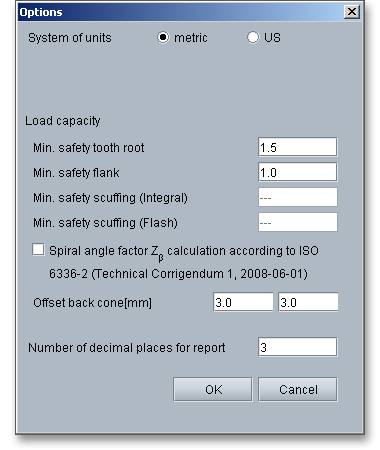
Click on the button ‘Options’ in the top menu bar of the eAssistant software to change some general settings.

Here are the default settings that you can modify: