
The interference fit is a frictional shaft-hub-connection. The joint pressure in the friction surfaces \(p_{F}\) that is necessary for the power transmission, is generated by the deformation of shaft and hub. According to the manufacturing method, you have to distinguish between a shrink and force fit. Shrink-fitting is a procedure in which heat is used to produce a very strong joint between two pieces of metal, one of which is inserted into the other. Heating causes one piece of metal to contract or expand on to the other, producing interference and pressure which holds the two pieces together. In a force fit of cylindrical parts, the inner member has a greater diameter than the hole of the outer member.
The calculation takes place according to DIN 7190 for cylindrical interference fits. In addition, the influence of the
centrifugal force, the stepped hub geometry, torque, radial force and bending moment are considered as
well.
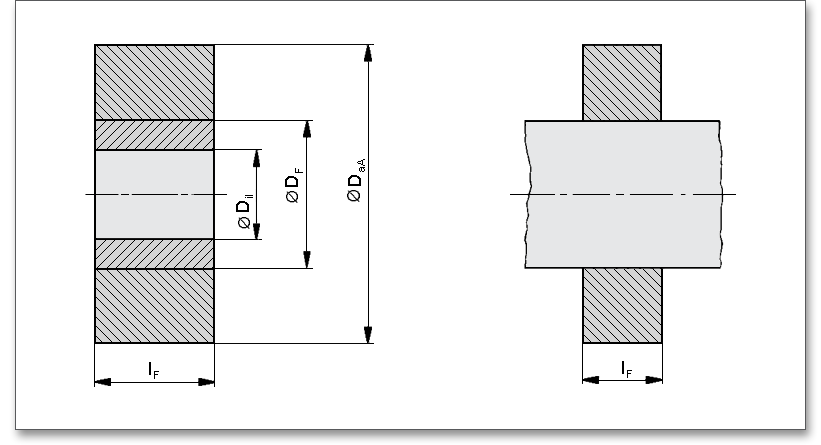
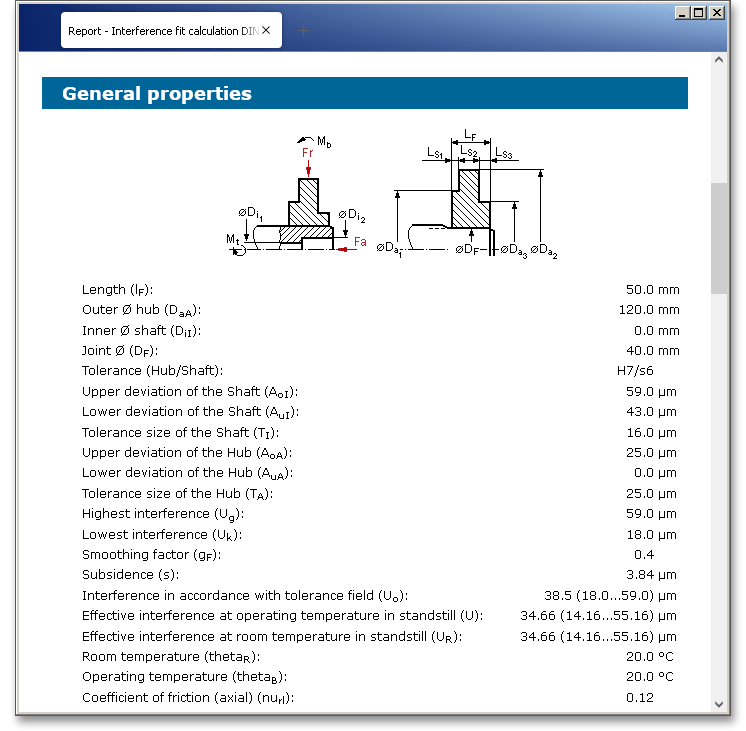
DIN 7190 defines the calculating basis for interference fits with cylindrical surfaces whose parts are made of metallic materials. This standard applies mainly for the common mechanical engineering but can be used also in other fields (e.g., precision engineering). The calculation method DIN 7190 applies for interference fits with a constant axial length of inner and outer part (see figure 1). The calculation can be used approximately for interference fits according to figure 2. Stress increases in the area of the hub edge are not considered.
For a comfortable selection and calculation of suitable tolerances, a dialog window for the selection of fits is included. This dialog window contains the tolerance system according to DIN ISO 286 including all IT classes.

In DIN ISO 286, the tolerances for the diameter are defined up to 500 mm. The desired tolerance field can be selected for hub and shaft from a listbox. An individual input of the upper and lower deviation is also possible. The lowest and highest interference as well as the fit type for the nominal diameter will be displayed. For the calculation of possible fits, the IT scope can be selected. The following IT scopes are available:
In order to find the required fit, different options are available. Based on the specified loads, the minimum
interference and the maximum interference are determined. These values will be displayed automatically in the
field ‘Calculation of possible fits’ and provide the basis for the dimensioning and selection of appropriate
tolerances. In addition, there is the possibility to define a tolerance field for the hub and shaft. Select the option
‘Show only preferred fits’ and click the button ‘Search fits’ and all possible fits will be displayed. Then just choose
the right fit.
Click the button ‘Selection’ in order to open the fit calculator and to let the calculation module propose a suitable fit. The fit calculator provides the tolerance system according to DIN ISO 286 including all IT classes. The upper part of the fit calculator allows to choose the tolerance field for the hub and the shaft.
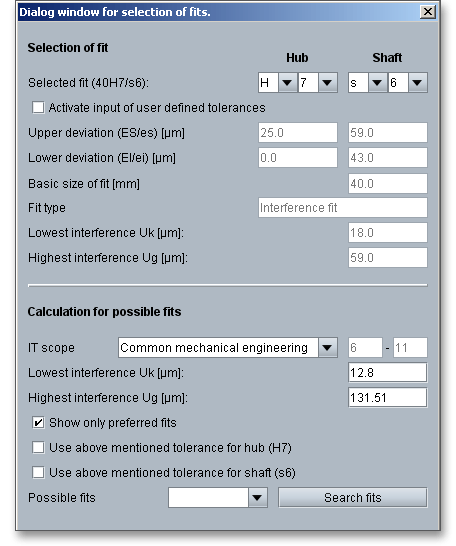
For the selected tolerance the upper deviation and the lower deviation for shaft and hub will be displayed. Furthermore, the fit type as well as the highest and lowest interference will be specified.

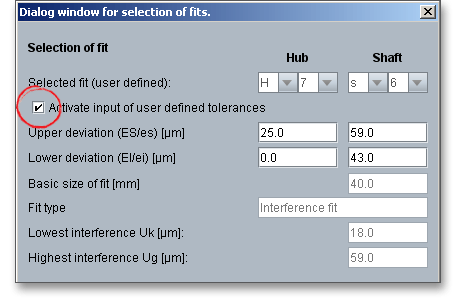
The deviations of shaft and hub can be entered manually. In order to do so, please enable the option ‘Activate the input of user defined tolerances’.
You can specify the lowest and highest interference. If you have defined all data in the main mask before, the required lowest and highest interference will be entered automatically.

Clicking the button ‘Search fits’ shows all possible fits. The message ‘More than 500 fits were found. Only preferred fits are shown’ may occur. Please confirm this message with ‘OK’ and choose a fit from the listbox.
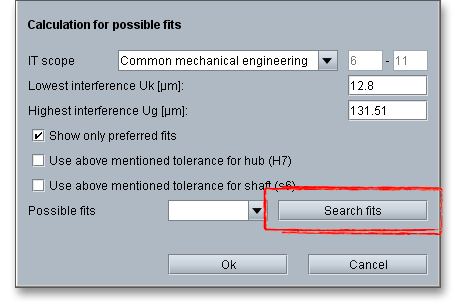
The option ‘Show only preferred fits’ is activated automatically and all preferred fits will be displayed in the listbox.
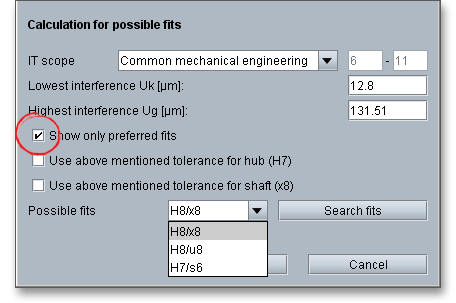
Please note: The option ‘Show only preferred fits’ is enabled by default. The list of fits is limited. Disable this
option and click the button ‘Search fits’. The number of fits increases.
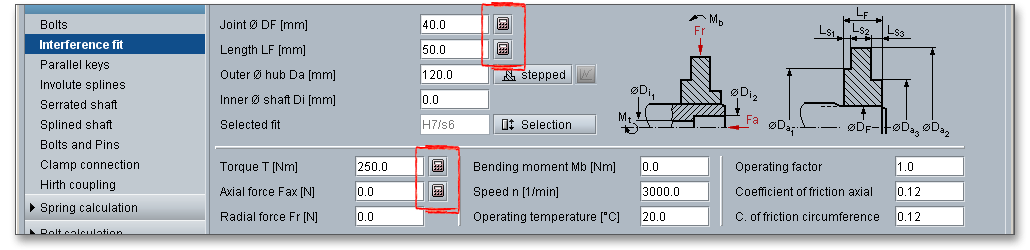
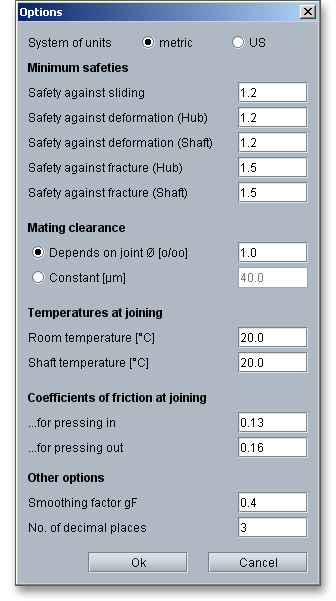
The button for the dimensioning functions is marked by a calculator symbol and is located next to the input fields. If you click on the dimensioning buttons, you get a suggestion for an appropriate input value. The calculation of the value is carried out so that the given minimum safety is fulfilled. The default value for the minimum safety is set to ‘1.2’. Clicking the button ‘Options’ allows you to change this value. A dimensioning function is available for the joint diameter, the length, the torque and the axial force.
The influence of the centrifugal force on the interference fit by the input of a speed is considered according to F. G. Kollmanns, Braunschweig ‘Rotierende Pressverbaende bei rein elastischer Beanspruchung’ (Konstruktion 33, 1981 H.6, pp. 233-239).

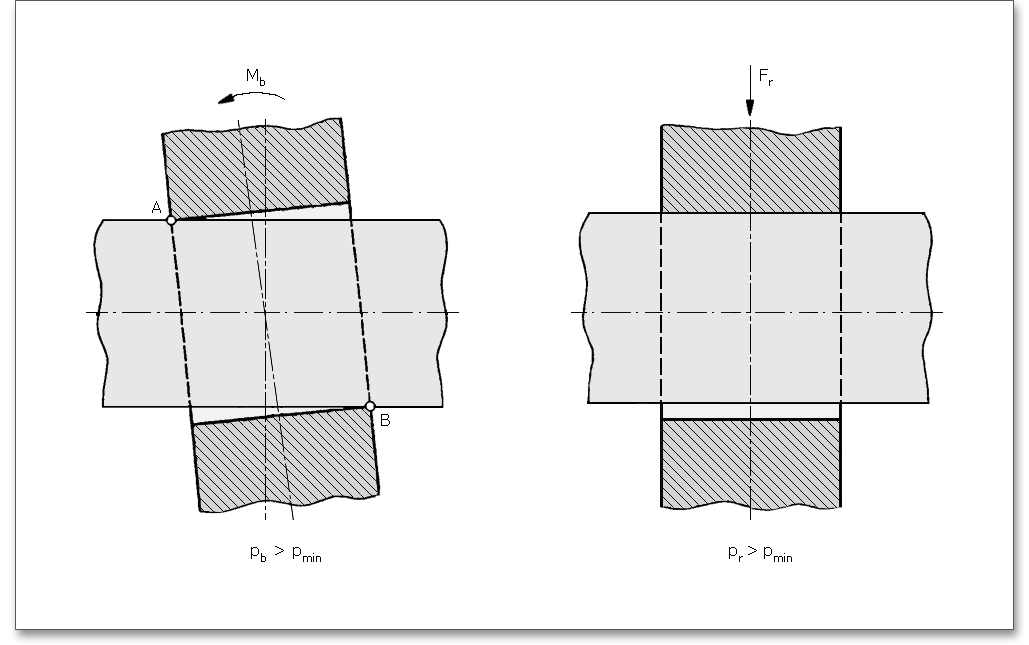
In addition to the consideration of axial and tangential forces, a radial and a bending moment can be specified. The calculation is carried out according to Mr. Prof. Gropp ‘Das Uebertragungsverhalten dynamisch belasteter Pressverbindungen ...’ and Mr. Prof. Hartmann ‘Berechnung und Auslegung elastischer Pressverbindungen’.

Resulting from the given loads for the bending moment and radial force, the additional external loads may be determined from the following equations:
\[p_{b} = \frac {9}{2} \frac {M_{b}}{(2-Q_{W})\cdot D_{F} \cdot l_{F}^{2}} \quad \mbox {and}\quad p_{r} = \frac {F_{r}}{d_{F}\cdot l_{F}} \]
For a too small minimum joint compression, the hub lifts off and a so-called gaping joint occurs. A gaping joint minimizes the joining surface available for the power transmission and is imperative to avoid. To avoid a gaping joint, the following condition has to be fulfilled:
\[p_{min} \geq p_{r} + p_{b}\]
If this condition is not fulfilled, then an appropriate warning/message appears.
The operating factor (application factor) is determined according to DIN 3990. The following table gives some values.
| Application Factors \(K_{A}\) According to DIN 3990-1: 1987-12
| ||||
| Working Characteristics | Working Characteristics of the Driven Machine
| |||
| of the Driving Machine | Uniform | Light shocks | Moderate shocks | Heavy shocks |
| Uniform | 1.0 | 1.25 | 1.5 | 1.75 |
| Light shocks | 1.1 | 1.35 | 1.6 | 1.85 |
| Moderate shocks | 1.25 | 1.5 | 1.75 | 2.0 |
| Heavy shocks | 1.5 | 1.75 | 2.0 | 2.25 or higher |
Uniform: e.g., electric motor, steam or gas turbine (small, rarely occurring starting torques)
Light shocks: e.g., electric motor, steam or gas turbine (large, frequently occurring starting torques)
Moderate shocks: e.g., multiple cylinder internal combustion engines
Heavy shocks: e.g., single cylinder internal combustion engines
Uniform: Steady load current generator, uniformly loaded conveyor belt or platform conveyor, worm conveyor,
light lifts, packing machinery, feed drives for machine tools, ventilators, light-weight centrifuges, centrifugal
pumps, agitators and mixers for light liquids or uniform density materials, shears, presses, stamping machines,
vertical gear, running gear
Light shocks: Non-uniformly (i.e. with piece or batched components) loaded conveyor belts or platform
conveyors, machine-tool main drives, heavy lifts, crane slewing gear, industrial and mine ventilators, heavy
centrifuges, centrifugal pumps, agitators and mixers for viscous liquids or substances of non-uniform density,
multi-cylinder piston pumps, distribution pumps, extruders (general), calendars, rotating kilns, rolling mill stands,
continuous zinc and aluminium strip mills, wire and bar mills
Moderate shocks: Rubber extruders, continuously operating mixers for rubber and plastics, ball mills (light),
wood-working machines (gang saws, lathes), billet rolling mills, lifting gear, single cylinder piston
pumps
Heavy shocks: Excavators (bucket wheel drives), bucket chain drives, sieve drives, power shovels, ball mills (heavy), rubber kneaders, crushers (stone, ore), foundry machines, heavy distribution pumps, rotary drills, brick presses, de-barking mills, peeling machines, cold strip c, e, briquette presses, breaker mills
The following table provides some approximate values for the coefficients of adhesion/coefficients of friction for shrink fits according to DIN 7190. The values are on the safe side and can be used for sliding in circumferential and longitudinal direction.
| Coefficients of Adhesion for Shrink Fits in
| |
| Longitudinal and Circumferential Direction During Sliding | |
| Mating of Material, Lubrication, Joining | Coefficients of Adhesion \(\nu _{R}, \nu _{rl}, \nu _{u}\) |
| Steel/Steel pair |
|
| Pressurized oil assembly normally joined with mineral oil | 0.12 |
| Pressurized oil assembly with degreased surfaces joined with glycerine | 0.18 |
| Shrink fit normally after heating the outer part up to \(300^{\circ }\)C in an electric kiln | 0.14 |
| Shrink fit with degreased surfaces after heating up to \(300^{\circ }\)C in an electric kiln | 0.20 |
| Steel/Cast iron pair |
|
| Pressurized oil assembly normally joined with mineral oil | 0.10 |
| Pressurized oil assembly with degreased surfaces | 0.16 |
| Steel/MgAl pair, dry | 0.10 to 0.25 |
| Steel/CuZn pair, dry | 0.17 to 0.25 |
The following table specifies the coefficients of adhesion/coefficients of friction for force fits according to DIN 7190. These values are valid for monotonic loading and are determined for inner parts made of X 210 Cr W12. They are valid for steel. After joining, the interference fits require sufficient time (24 hours is best) before first loading to assure a strong joint.
| Materials | Coefficients of Adhesion | |||||
| Old | New | dry | lubricated | |||
| Number | \(\nu _{ll}\) | \(\nu _{rl}\) | \(\nu _{ll}\) | \(\nu _{rl}\) | ||
| St 60-2 | E 335 | 1.0060 | 0.11 | 0.08 | 0.08 | 0.07 |
| GS-60 | GE 300 | 1.0558 | 0.11 | 0.08 | 0.08 | 0.07 |
| RSt37-2 | S 235JRG2 | 1.0038 | 0.10 | 0.09 | 0.07 | 0.06 |
| GG-25 | EN-GJL-250 | 0.6025 | 0.12 | 0.11 | 0.06 | 0.05 |
| GGG-60 | EN-GJS-600-3 | 0.7060 | 0.10 | 0.09 | 0.06 | 0.05 |
| G-AlSi12 (Cu) | EN AB-44000 ff. | 0.07 | 0.06 | 0.05 | 0.04 | |
| G-CuPb10Sn | CB495K | 2.1176.01 | 0.07 | 0.06 | -1 | -1 |
| G-CuSn10Pb10 | ||||||
| TiAl6V4 | TiAl6V4 | 3.7165.10 | -1 | -1 | 0.05 | -1 |
The above-mentioned table means:
The coefficients of adhesive friction/coefficients of friction are dependent upon the following factors:
Due to the friction within the joint, the coefficients of adhesive friction are subject to statistical fluctuations.
Therefore, the defined coefficients of adhesive friction are approximate values and are on the safe
side. The values can be replaced by an experimental determination of values according to DIN
7190.
For the stepped hub or/and shaft (see figure below), there is a larger joint compression on the thick-walled
segment than on the thin-walled segment for the same fit. Hence, widely different stress and deformation ratios
occur on each segment. In that case, the total length \(L_{F}\) has to be used. The hub can be considered as composed
of separate discs of different diameters. From it, the mean joint pressure for the interference fit is
determined. Because the stresses and deformation cannot change abruptly from one segment to another
segment, this method of segmentation presents an approximation. The effort to define the matching
conditions or to determine the joint compression by using FEM calculation is just useful for critical
cases.
The calculation is determined according to the algorithm in Prof. Hartmanns ‘Berechnung und Auslegung elastischer Pressverbindungen’.
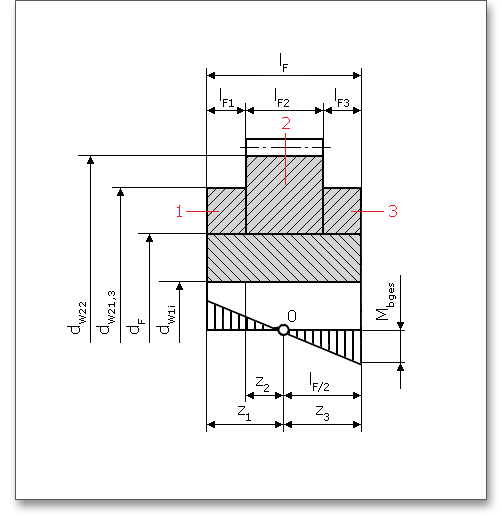
Click on the button ‘stepped’ next to the input field ‘Outer diameter hub’ to consider the stepped hub geometry. Any number of segments can be defined.
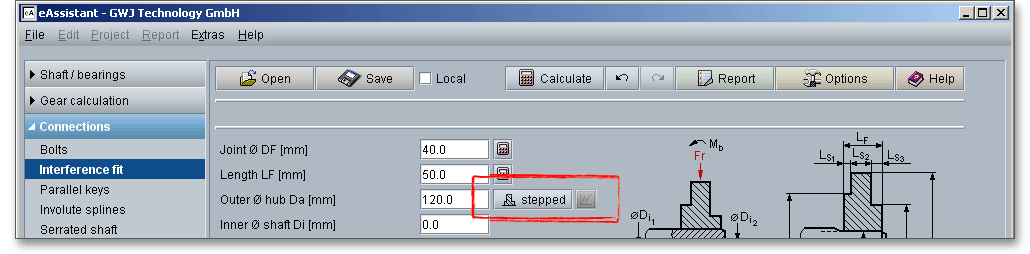
The figure (see figure 15.14) shows how the segmentation has be specified. A segment can contain a constant outer hub diameter and inner shaft diameter. If a shaft bore extends over two outer hub diameters of different size, then two segments has to be defined with a different outer hub diameter and equal inner shaft diameter. In case there is a stepped shaft bore within a constant hub outer diameter, then use this method, too (a definition of two segments with equal outer hub diameter and different inner shaft diameter).
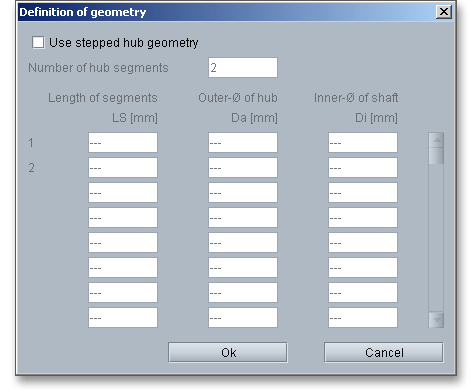
Place a checkmark in order enable and use the stepped hub geometry.
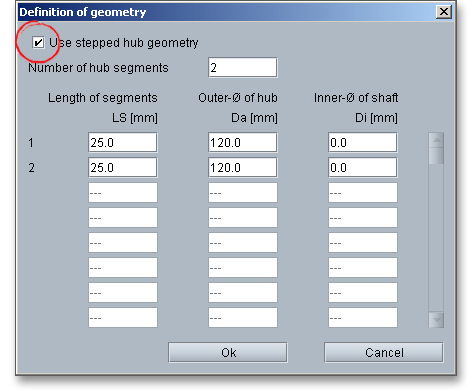
Now you can start to define the segments. Enter the number of segment and add the segment length, outer hub diameter and inner shaft diameter.
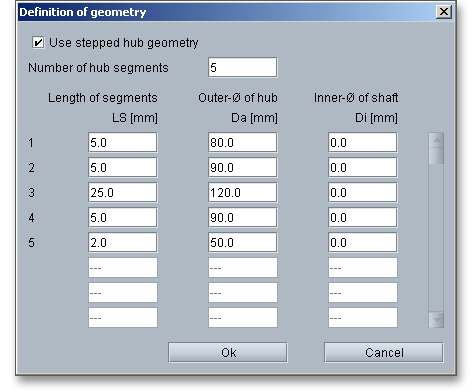
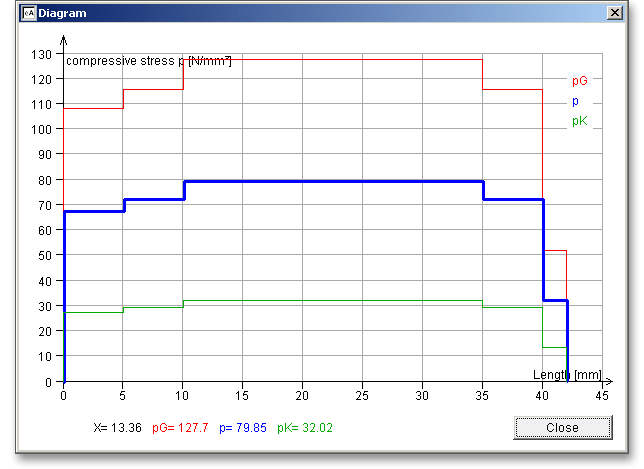
Clicking the ‘OK’ button applies your input values and the diagram button will be enabled.

That diagram shows the compressive stress along the fit length. Move the mouse over the diagram to see the values for the lowest (pK), highest (pG) and mean (p) compressive stress due to the lowest, highest and mean interference.
Due to the smoothness of asperity peaks during the joining, only the interference \(U_{w}\) is available. Unless there are experimental values, the equations according to DIN 7190 for force and shrink fits are:
\[U = U_{o} - s \quad \mbox {and}\quad s = 0.8(R_{zA} + R_{zI})\]
where \(s\) is the subsidence that results from the determined surface roughness \(R_{z}\) of inner and outer part. \(U_{o}\) is the
lowest, highest and mean interference.
If the values of the surface roughness for the arithmetic mean value of the profile coordinates \(R_{a}\) (formerly the arithmetical mean deviation of the roughness profile \(R_{a}\)) are specified according to DIN EN ISO 4287, then the determined mean values according to DIN 7190 can be used for the surface roughness \(R_{z}\) (see table below). Select the entry ‘User defined’ from the listbox ‘Surface’. Now the input field next to the listbox is enabled and you can enter a value for the surface roughness \(R_{z}\).

| Comparison of Mean Roughness \(R_{a}\) and Average Roughness \(R_{z}\)
| ||||
| \(R_{a}\) in \(\mu {m}\) | Ra0.8 | Ra1.6 | Ra3.2 | |
| \(R_{z}\) in \(\mu {m}\) | from | 3.15 | 6.3 | 12.5 |
| to | 10 | 20 | 31.5 | |
| Average surface roughness \(R_{z}\) in \(\mu {m}\) | Rz6.3 | Rz12.5 | Rz20 | |
The calculation of the modification of diameter at the inner and outer diameter of shaft and hub takes place
according to Niemanns ‘Maschinenelemente’ volume 1 pp.789, 3rd edition 2001. There, the modification of the
diameter is considered by the joint pressure and centrifugal force. The influence of temperature on the
modification of diameter is considered on the outer diameter of the shaft and on the inner diameter of the hub by
the modified interference and joint pressure.
According to Niemann ‘Maschinenelemente’ volume 1 p.800, 3rd edition 2001, the torque is transmitted also during repeated load by elastic transformation (i.e., without slip), if the torque \(T\) is smaller than the maximum torque \(T_{E}\). For a solid shaft, disk-shaped hub with \(L_{F}/D_{F} > 0.25\) and shaft and hub with equal E modulus, it is expressed as:
\[T_{E}\leq \frac {T \cdot S_{R}} {\sqrt \frac {8}{(1 - Q_{A}^{2}) } \cdot 2 \cdot \frac {L_{F}}{D_{F}} } \]
\(T \cdot Sr\)is the slipping torque against fretting corrosion. This results in remedial measures against fretting
corrosion. The joint pressure, coefficient of adhesion in terms of circumference, the joint diameter or the
safety against sliding can be increased in order to avoid micro sliding/fretting corrosion. A rotating
bending may cause fretting corrosion. If the mentioned conditions for a possible determination of the
maximum torque are given, the maximum torque is calculated for the minimum, mean and maximum
interference.
In shrink fits, the outer member is heated or the inner part is cooled, or both, as required. The calculation of the temperatures to cool the inner part or to heat the outer part is dependent upon the chosen minimum fit. Additionally, a mating clearance for joining has to be kept to avoid adhesion. For an individual production, it is recommended to use the following mating clearance
\[U_{s\vartheta } = 0,001 \cdot D_{F} \]
For the individual production the risk of premature adhesion of the joining parts is covered before the assembly
process is completed. By using joining devices, the above recommended mating clearance can be fallen below.
Click on the button ‘Options’ to define the mating clearance. Two possibilities are available. On the one hand, the
mating clearance can be specified dependent upon the joint diameter, on the other hand a mating clearance can
be entered directly in \(\mu m\).
In general, the room temperature as well the joint temperature of the inner part are set. The required joint temperature is calculated as follows:
\[\vartheta _{Aerf} = \vartheta _{R} + \frac {U_{F}}{\alpha _{A}\cdot D_{F}} + \frac {\alpha _{I}}{\alpha _{A}} \cdot (\vartheta _{I} - \vartheta _{R}) \]
The button ‘Options’ allows to change the room temperature and the joint temperature of the shaft (see section
15.23 ‘The Button Options’). The highest joint temperature may not exceed the required work piece features of
the heat-treated parts.
In the following table, the data according DIN 7190 valid data are specified for the maximum joint temperatures dependent on the material of the outer part and the heat treatment.
| Joint Temperature
| |
| Material of the Outer Part (Hub) | Joint Temperature \(^{\circ }\)C Maximum |
| Structural steel lower strength | |
| Cast steel | 350 |
| Modular cast iron | |
| Hardened and tempered steel or cast steel | 300 |
| Surface layer hardened steel | 250 |
| Case-hardened steel or high-tempered structural steel | 200 |
The following table provides the coefficients of linear thermal expansion for inner and outer part.
| Poissons Ratio, Elastic Modulus, Coefficient of Linear Thermal Expansion
| ||||||
| Materials | Material | Poissons | Elastic Modulus | Coefficient of Linear
| ||
| No. | Ratio | \(N/mm^{2}\) | Thermal Expansion \(\alpha \) | |||
| \(\nu \) | \(\approx \) | \(\frac {10^{-6}}{^\circ C}\)
| ||||
| \(\approx \) | Heating \(\approx \) Supercool
| |||||
| MgAl8Zn | 3.5812 | 0.3 | ||||
| AlMgSi | 3.2315 | 0.34 | 65,000 to 75,000 | 23 | -18 | |
| AlCuMg | 3.1325 | 0.33 to 0.34 | ||||
| GG-101 | 0.6010 | 70,000 | ||||
| GG-151 | 0.6015 | 0.24 | 80,000 | 10 | -8 | |
| GG-201 | 0.6020 | 105,000 | ||||
| GG-251 | 0.6025 | 0.24 to 0.26 | 130,000 | |||
| GGG-50 | 0.7050 | 0.28 to 0.29 | 140,000 | 10 | -10 | |
| Malleable cast iron | 0.25 | \(>\) 90,000 to 100,000 | 10 | -8 | ||
| C-steel low alloyed | 0.3 to 0.31 | |||||
| Ni-steel | 0.31 | 200,000 to 235,000 | 11 | -8.5 | ||
| Bronze | 0.35 | 16 | -14 | |||
| Red brass | 0.35 to 0.36 | 80,000 to 85,0000 | 17 | -15 | ||
| CuZn39Pb3 | 2.0401 | 0.37 | ||||
| CuZn37 | 2.0321 | 0.36 | 18 | -16 | ||
| 1 Not allowed for system engineering in metallurgy/rolling mills
| ||||||
Liquid nitrogen \((\vartheta _{I} = -195.8^\circ C)\) is used to cool shrink fits. Liquid nitrogen shrink fitting is one of the safest assembly methods. In
some cases \(CO_{2}\) dry ice \((\vartheta _{I} = -78.4^\circ C)\) is also used as a coolant. Based on the maximally permissable temperature of the hub, it
must be decided whether the cooling process is necessary or not.
The required pressing force for joining is determined from:
\[F_{e} = \pi \cdot D_{F}\cdot l_{F}\cdot \vartheta _{ll} \cdot p_{max} \]
The ‘Option’ button allows to define the coefficients of adhesion \(\nu _{ll}\) for pressing in and pressing out (see also section 15.23 ‘The Button Options’). The table (see table 15.8) specifies the coefficient of adhesion \(\nu _{ll}\). The maximum joint pressure \(p_{max}\) is determined for the highest interference. In case the joining surfaces are not lubricated with grease, larger coefficients of friction and larger longitudinal and tangential forces occur. There is a risk of scuffing for joining surfaces that are not lubricated, in particular for a elastic-plastic dimensioning. Before joining, the joining surfaces should be lubricated with oil.
Furthermore, the following information has to be considered for the engineering design according to DIN 7190:
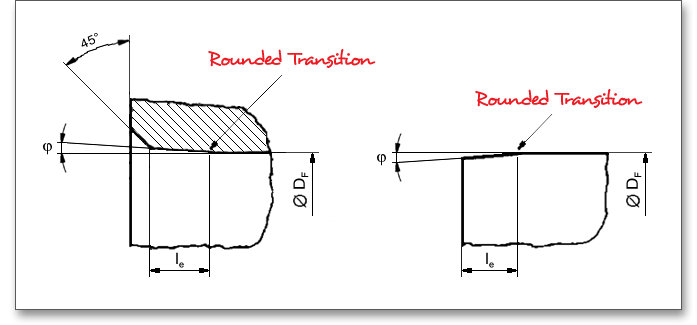
The values for the edge length \(l_{e}\) are specified in the following table. The unit is indicated in mm.
| Edge Length \(l_{e}\)
| |||||
| \(D_{F}\) | \(D_{F}\) | ||||
| over | to | \(l_{e}\) | over | to | \(l_{e}\) |
| 50 | 80 | 4 | 400 | 630 | 8 |
| 80 | 160 | 5 | 630 | 800 | 9 |
| 160 | 250 | 6 | 800 | 1,000 | 10 |
| 250 | 400 | 7 | 1,000 | - | 10 |
This applies for the calculation of the edge length
\[l_{e} \approx \sqrt [3]{D_{F}}\]
During the manufacturing process of interference fits by force fitting, the joining area is provided with a thin oil
film over the entire surface. A jamming of the assembled parts must be avoided. The slip-stick effect can be
avoided by the press-in speed and discharge speed of approx. 50 mm/s and sufficient pressing force (2.5x
extraction force). Force fits requires sufficient time (24 hours) before first loading, then the complete adhesive
force is reached (only 70% immediately after pressing).
The following section gives some guidance on selecting fits according to E. & K. Felber. There are features
that can be expected in general during the assembly. The assembly rules specify the character of
the fit and all features correspond to the mean value of fits. The list contains fits that are used
frequently. Almost all fits can be formed in quality (e.g., from H8/u8 to H8/u7 to H6/u6). In general, the
standard fits (e.g., H8/u7) can be used. According to the function, you have to select fine qualities
(e.g., H6/u6) for larger requirements (requirements for accuracy and uniformity). The following
examples are taken from the mechanical engineering and cannot to be considered as complete in any
detail.
Examples for interference fits: H8/u8; U8/h7; H8/s7; S7/h6; H7/r6; R7/h6
Features, assembly rule: The parts are assembled and tightened and have a strong interference. The parts
are pressed together or assembled into position while hot and cooled. In general, a safety device against torsion
or shifting in lengthwise direction is not necessary.
Examples: Spur gears that are mounted tightly on a shaft, couplings, collar rings, press rings, wheel rims,
bearing bushings in housings, bushings in gear hubs, tight pivots, bushings made of synthetic resin pressed
material, parts which cannot be loosened by large forces.
eAssistant provides two unit systems: the metric system and the U.S. customary unit system. You can quickly switch between the units. To select the unit system, click the button ‘Options’ and decide for a unit. It is also possible to change the unit by clicking the label field. When you click the label field, a context menu will open providing all available units within the unit system. The change should take effect immediately. All settings will be saved to the calculation file. As soon as you select a unit, the current field value will be converted automatically into the chosen unit.

The button ‘Undo’ allows you to reset your input to an older state. The button ‘Redo’ reverses the undo.

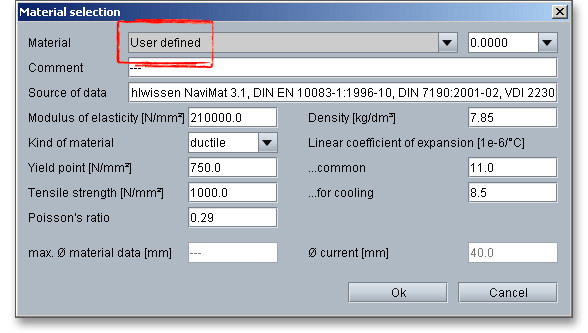
Select an appropriate material directly from the listbox. Clicking the button ‘Material’ opens the material database. In case there is no material that will fulfill the design requirements, then simply define your individual material. You will find the entry ‘User-defined’ in the listbox. If you select this option, the input fields will be enabled, so that you can enter your own input values or add a comment. Please select the material from the list. You will get detailed information on the material. The two cursor keys ‘Up’ and ‘Down’ of your keyboard allows you to navigate through the material database, so you can compare the different material properties with each other.

In case you cannot find the material you are looking for in our extensive material database, you can define your individual material. Select the option ‘User defined’ and all inputs and options are activated and you can specify your individual material very easily. Your inputs will be saved to the calculation file. Please be advised that changing the material will delete your defined inputs and you have to enter the inputs again.
The calculation module provides a message window. This message window displays detailed information, helpful hints or warnings about problems. One of the main benefits of the program is that the software provides suggestions for correcting errors during the data input. If you check the message window carefully for any errors or warnings and follow the hints, you are able to find a solution to quickly resolve calculation problems.

The quick info feature gives you additional information about all input fields and buttons. Move the mouse pointer to an input field or a button, then you will get some additional information. This information will be displayed in the quick info line.
All important calculation results, such as the lowest, highest and mean interference, will be calculated during every input and will be displayed in the result panel. A recalculation occurs after every data input. Any changes that are made to the user interface take effect immediately. Press the Enter key or move to the next input field to complete the input. Alternatively, use the Tab key to jump from field to field or click the ‘Calculate’ button after every input. Your entries will be also confirmed and the calculation results will displayed automatically. If the result exceeds certain values, the result will be marked red.
After the completion of your calculation, you can create a calculation report. Click on the ‘Report’ button.

You can navigate through the report via the table of contents that provides links to the input values, results and figures. This calculation report contains all input data, the calculation method as well as all detailed results. The report is available in HTML and PDF format. The calculation report saved in HTML format, can be opened in a web browser or in Word for Windows. You may also print or save the calculation report.
When the calculation is finished, it is easy to save the calculation. You can save your calculation either to the eAssistant server or to your computer. Click on the button ‘Save’.

Before you can save the calculation to your computer, you need to activate the checkbox ‘Local’ in the calculation module. A standard Windows dialog for saving files will appear. Now you will be able to save the calculation to your computer.
In case you do not activate the option in order to save your files locally, then a new window is opened and you can save the calculation to the eAssistant server. Please enter a name into the input field ‘Filename’ and click on the button ‘Save’.
Click the button ‘Options’ in order to change the default settings. The button ‘Options’ allows you to define the minimum safeties, the mating clearance, the temperatures at joining (room temperature and shaft temperature) as well as the coefficient of friction at joining for pressing in and pressing out for a force fit. Additionally, there is the possibility to enter the number of decimal places for the output of the numerical values in the report.

Here are the default settings that you can modify:
Please login with your username and your password. To start the calculation module for interference fits, please
click the menu item ‘Connections’ on the left side and then select ‘Interference fit’.
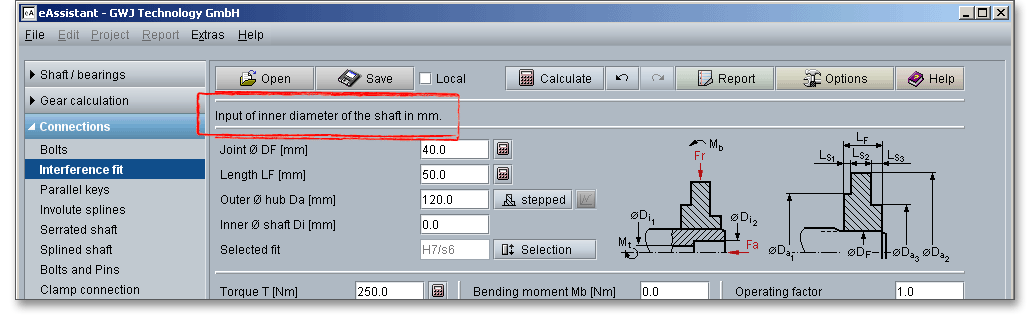
A cylindrical interference fit has to be dimensioned against sliding. Enter the following values:
| Joint diameter | = 50 mm |
| Length | = 20 mm |
| Outer diameter hub | = 95 mm |
| Inner diameter shaft | = 30 mm |
| Torque | = 80 Nm |
| Axial force | = 125 N |
| Speed | = 2,000 min/-1 |
| Operating temperature | = \(25^{\circ }\)C |
| Operating factor | = 1.2 |
| Coefficient of friction axial | = 0.15 |
| Coefficient of friction circumference | = 0.15 |
| Material shaft | = 20MnCr5 |
| Surface shaft | = N6 |
| Material hub | = C45 hardened and tempered |
| Surface hub | = Rz=6 |
Please start to enter the values into the input field. All important calculation results will be calculated during every input and will be displayed in the result panel. A recalculation occurs after every data input. During the input of the values it can happen that the results will be marked in red. Nevertheless, please continue to enter the data as usual.
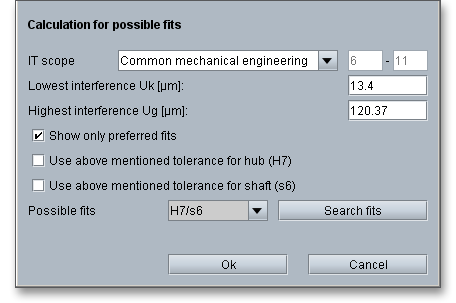
Please note: Please note the section ‘Selection of fit’ for the specification of the tolerances. With the definition
of the surface quality of the hub, you have to notice that the given value (Rz=6) has to be entered by the ‘User
defined’ input. Select ‘User defined’ in the appropriate listbox and enter the desired value into the input field next
to the listbox.
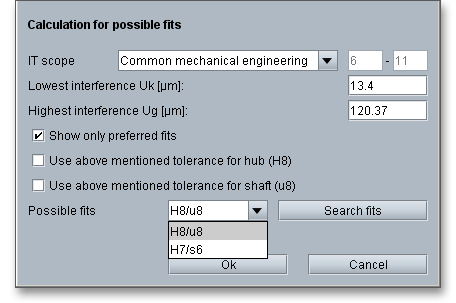
The button ‘Selection’ allows you to open the dialog window for selection of fits. Here you can choose the possible tolerances or the appropriate fits can be suggested.

Enable ‘Show only preferred fits’ and click the button ‘Search fits’.
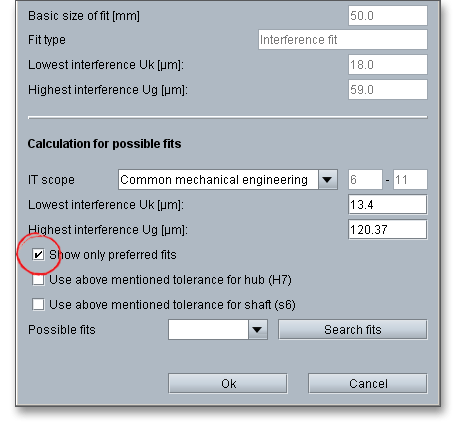
Two fits will be recommended to you.
Select the fit H7/s6 and click the button ‘Ok’.
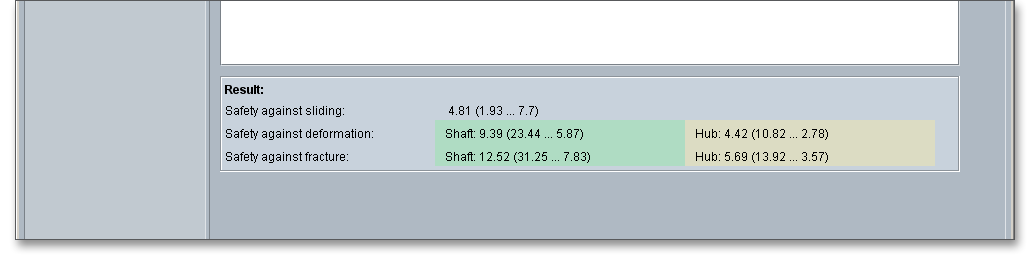
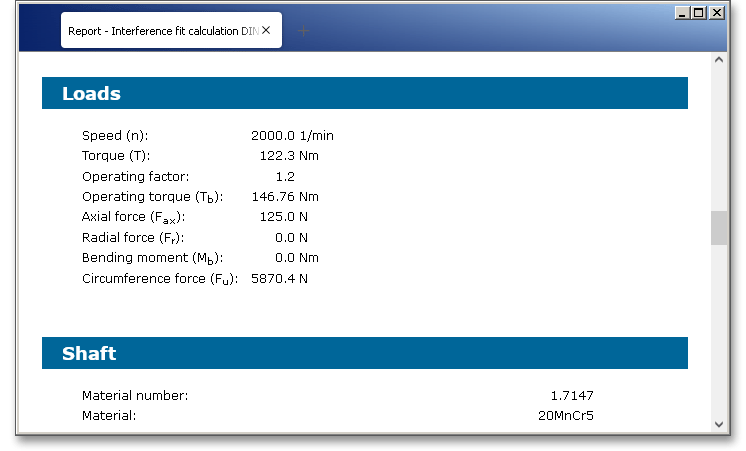
Due to the fit calculation, a safety close to the given minimum safety has been determined. By the help of the comfortable dimensioning functions, other values can be checked and optimized regarding the use of the minimum safety. So the maximum torque can be defined using the given minimum safety against sliding \((S_{R}=1.2)\). The button ‘Options’ allows you to specify the minimum safety. Click on the dimensioning button (‘calculator symbol’) next to the input field for the torque.

The maximum torque is determined.

Here the maximum torque is ‘83.60 Nm’. If you enter now a higher value than ‘83.60 Nm’, the safety against
sliding is fallen below.
The calculation result is marked in red. You will get an appropriate information in the message window.

Now click on the calculator symbol again, then the maximum torque is determined (83.50 Nm)
and the minimum safety of ‘1.2’ is fulfilled. The specifications of the results is given for the lowest,
highest and mean interference. If the minimum safety is not fulfilled, then the safety is marked in
red.
All important calculation results, such as the lowest, highest and mean interference, will be calculated during every input and will be displayed in the result panel. A recalculation occurs after every data input. Any changes that are made to the user interface take effect immediately. If the result exceeds certain values (e.g., the minimum saftey), the result will be marked red.

In case you have finished your calculation, please click on the button ‘Report’.

The calculation report contains a table of contents. You can navigate through the report via the table of contents that provides links to the input values, results and figures. The report is available in HTML and PDF format. Calculation reports, saved in HTML format, can be opened in a web browser or in Word for Windows.
You may also print or save the calculation report:
When the calculation is finished, it is easy to save the calculation. You can save your calculation either to the eAssistant server or to your computer. Click on the button ‘Save’.

Before you can save the calculation to your computer, you need to activate the checkbox ‘Local’ in the calculation module. A standard Windows dialog for saving files will appear. Now you will be able to save the calculation to your computer.
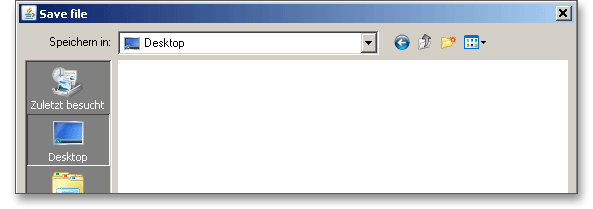
In case you do not activate the option in order to save your files locally, then a new window is opened and you can save the calculation to the eAssistant server. Please enter a name into the input field ‘Filename’ and click on the button ‘Save’.

Our manual is improved continually. Of course we are always interested in your opinion, so we would like to know what you think. We appreciate your feedback and we are looking for ideas, suggestions or criticism. If you have anything to say or if you have any questions, please let us know by phone +49 (0) 531 129 399-0 or email eAssistant@gwj.de.